We recently got half a roof put on the bike barn. The students fixed up fifteen bikes and laid out a roof in three long hours. Excellent work ethic, if not visuals. I’ll be getting out and fixing up the barn throughout the spring semester. I hope to add a waterproof holding bin & tool rack to it in the next service day.
This Week in the Classroom: Computer Science & Electronics
The Fall 2011 semester came to an end last week. I’m taking stock of what-used-to-be (my previous semesters classes) and re-tooling, re-gearing and re-searching my way into new course-load.
I’d like to start with my Computer Science & Electronics course. I described this course as:
This course introduces computer programming to students with little or no prior programming or technology experience. Students will use Alice, 3D graphical computer language, to introduce basic computer science theory. Topics to be covered include program design and problem solving, Boolean operators, logic statements, loops and flowcharts. Unlike other languages, Alice lends itself to an exploration of thought, rather than an exercise in coding or mathematical ability. If time allows, the Python language will also be explored. In the electronics portion, students will explore basic electronic concepts of resistance, current and voltage. Students will learn to build, manipulate and understand basic circuits & operate the tools necessary to create these circuits. Students will identify basic parts, such as resistors, switches, wires and capacitors.
So, let’s go over the class and see how I did and what I will do better in the future.
 Continue reading “This Week in the Classroom: Computer Science & Electronics”
Classroom Projects: The Tea Box
This fall, I made an effort to produce a “high-quality” product – and by this I mean hardwoods, nice finishes, proper construction techniques and professional quality work. This effort resulted in the “Tea Box” project. I also tried to maximize the amount and quantity of hand tools used versus the necessity of power tools.

Toy Making Jigs
My son has very strong feelings about woodworking show hosts. “Herm” (Norm) is his favorite – he’s in love with power tools. Me? I prefer St. Roy.
In this episode, St. Roy discussed and built several toys from 18th century America. I was especially fascinated by the jig he uses to create small parts. I saw an opportunity to move the jig into the classroom, especially as I wanted to build small wooden sculptures made from patterns created in Google Sketch Up. I can’t say much about the project yet – somethings work, somethings don’t. It’s quickly running away from what I originally envisioned. Not in a bad way either – just different. The students start by making geometric patterns with blocks and polygons. Kind of like this:
 Then the students turn these geometric patterns into a CAD rendition. I’ve set up the pattern blocks in a CAD file.
 Either way, the jig is up – or rather, the jig works beautifully well.
 You can see the entirety of the jig here. I use the jig upside-down on tables. The crossbar usually sits in a vise as in St. Roy’s show. The students are able to cut safely and securely with a coping saw. I’m going to get a lot of mileage out of these jigs.
I hope to post more as the project develops over the next two weeks. I’m also working on a semester review of the technology classes.
Make it safe & keep the rubber side down this weekend.
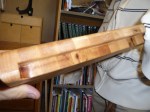
Quick Pic: Cutting Boards
Somehow, several large planks of long-grain butcher-block style planks have come my way. Nothing better to do than prep some cutting boards and let the kids turn them into something special.


The boards are finished with food-safe mineral oil, specifically Wisconsin Hardwoods’ Wood Oil. Always make sure you use a food-safe finishes (which limits you to beeswax, food-safe mineral oil and “salad-bowl” finish) when you create spoons, cutting-boards, etc. I also use food-safe (or a water-based acrylic) for the stuff my little ones will chew on. Such as blocks and cars.
Update: As Scott Turner posts below, most finishes are food-safe once dry (and apparently I eat a lot of shellac). Flexner on finishing is a better resource than me. I will add that film finishes – I’m thinking shellacs and lacquers here – should be considered inappropriate rather than non-safe. The board will be chopped on right? So why put a film down? Thanks Scott for your input & the note on Flexner!
Make it safe & keep the rubber side down.
This Week in the Shop: Make: Plywood Chairs
A few issues ago, Make Magazine published plans for a jigsaw puzzle chair, and I needed chairs for my “dining room”. In reality, I needed chairs, I had plywood and this plan jumped out at me. I used a jigsaw to rough-cut the piece. Then I finished the pieces with a bandsaw, rasps and a router with flush-cut bit. Here’s the first chair.

Before you ask, yes, it isn’t sturdy enough. The original plans called for 3/4 in thick plywood. I only had half inch, but it’s what I had on hand. I will install some sort of brace. We’ll see how that changes the way this chairs works. Tell me what you think so far –
Make it safe & keep the rubber side down.
This Week in the Classroom: Production Boxes
If you ask him how to do it he’ll say just like noah built the ark
you’ve got to hold your mouth right son and never miss your mark.
-Guy Clark, “The Carpenter”
Safety in the Shop: Other People’s Tools
This weekend I attended a welding class. I’m trying to get some practice laying beads with a MIG welder. A major safety hazard of welding is being “flashed” by the spark of electricity between the machine and workpiece. “Flashing” means the brightness of the arc has burned your retinas and can cause severe eye irritation, temporary blindness, redness, etc. You avoid this by wearing a proper welding helmet and warning bystanders that you will start welding.

I, of course, got flashed this weekend.
The fault wasn’t “my own”. Meaning it wasn’t my personal action which cause the flash. I kept my eyes away from the arc and such. But I failed to examine my helmet – someone had “repaired” the helmet using zip-ties to hold the visor in place. Which meant holes and such in the lens, which meant that as I welded parts together….I flashed myself.
In a way though, the fault was my own. It’s my responsibility to examine my tools and equipment before I use them. It’s my job to protect myself from injury. So always examine your tools and equipment – especially if some other yokel uses it or owns it.
Make it safe & keep the rubber side down this weekend.
Community Watch: TX/RX Labs
This fall, I will be attending the 3D CAD, Plasma Cutter, Arduino & Welding I&II courses @ TX/RX Labs of Houston, TX. TX/RX is a non-profit hackerspace – a place for machine and electronic-centric project work -which recently opened on Commerce St. I’ve been by on their Friday night Open Houses and the crowd seems friendly, diverse and intensely interested in their “thing” – whatever project has lit up their world that day. It’s a crowd where a teacher like me gets to be a kid again.
The group is relatively new, having just picked up their non-profit status. I’ve been impressed with the quality of their (volunteer) teachers & equipment. I’m still not sold on them as a working space, as I tend to be an organization freak when it comes to shop space. They are still building out their workshop, so a little mess is understandable. Memberships start small and I would imagine worth every penny for someone without access to their variety of tools.
And the projects coming out of there speak for themselves.
This Week in the Shop: The Tool Chest
If I haven’t made clear prior to this post, I have space issues at work. I hold wood-shop classes in the great outdoors, rain or shine (ok, just shine), cold or hot. Morning and afternoon. I’ve been looking for a storage solution for the many “wood-centric” tools that end up in the outdoor space but away from the our tool storage trailer.
My solution looks something like this:

It’s not a pretty thing, but the design has a long gestation. Chris Schwarz has been promoting his conversion to hand tools for years now – and he finally documents the slow spiral in “The Anarchist’s Tool Chest”. He’s got a book, I guess I have this blog. Either way, I decided on a 24″ by 18″ by 18″ dovetailed box. The moldings and bottoms were nailed and glued on, while the top has a split piano hinge as it’s method of movement. Most of the dovetails and dadoes are splined for strength (because I can’t cut a tight dovetail) and I used a L-N low angle block plan to get the pins and tails even. I only used power tools for milling the wood.

Let’s take a trip inside. First, a tool tray with a small selection of hammers, nail sets, wrenches, etc.
 A chisel/gouge/trisquare rack,
 a saw till,
 and some places for hand plane storage.
 Over the next few weeks, I will be attaching handles, finding some storage solution for safety glasses, paint & varnish and carrying handles. I’ll keep you posted.
Make it safe & keep the rubber side down.
