Thresholds and AI: Mindsets & Toolsets for a Maker

A close up of a recent work that showcases new techniques – veneered bricks of wood, laminated construction of the pull using CNC and table saw to trim. Several coats of oil finish. I used AI to research and troubleshoot issues with my CNC router to create this level of craft.

The Threshold Problem For Makers

There’s a fascinating phenomenon in chemistry called activation energy – the minimum amount of energy that has to enter a system before the chemical reaction can occur. Remarkably, this idea, that a system or object needs a minimum “thing”, whether energy, momentum, quality, for a certain outcome to occur can be found across academic disciplines and industries. I call this the “threshold problem” in my personal vocabulary. Often, a threshold problem of one kind or another blocks my progress as a maker or educator.

Below the threshold, I often can’t get an idea from my head to the shop floor or into the classroom. Once past that threshold, I’m able to execute a vision. Since I started making nearly 20 years ago – furniture, educational content or art – I’ve recently adopted a tool that lowers the activation energy: AI. In my maker process, I break making up into three steps: ideation, preparation and execution. The AI tools help me cross the threshold in all phases to a complete project.

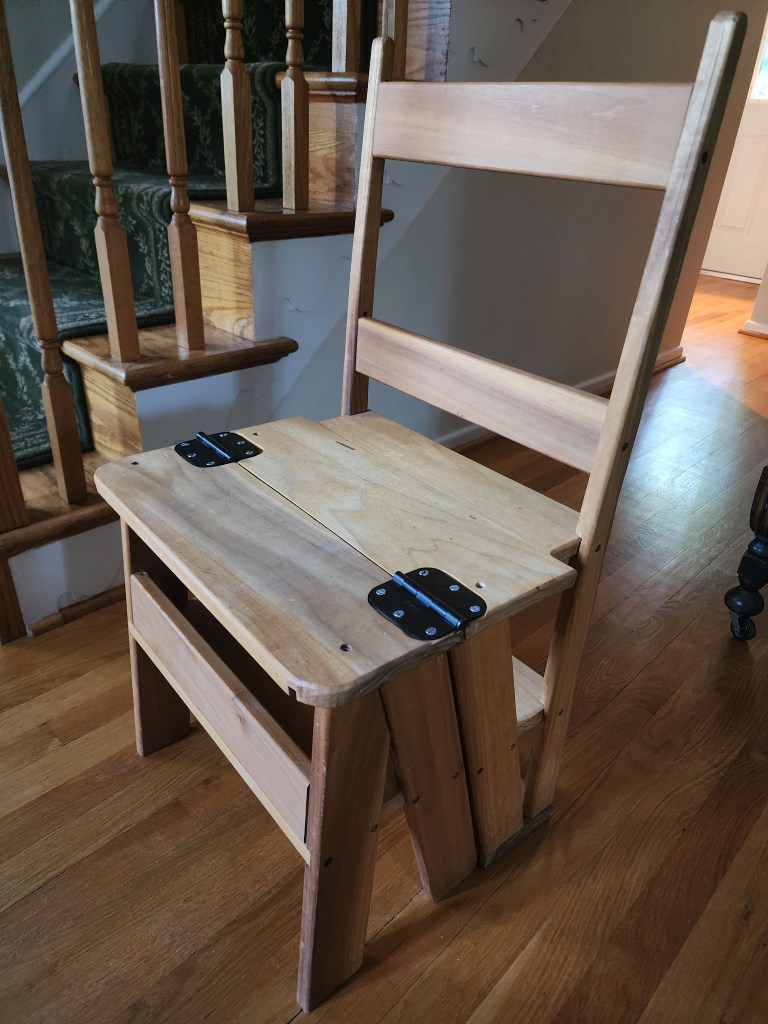
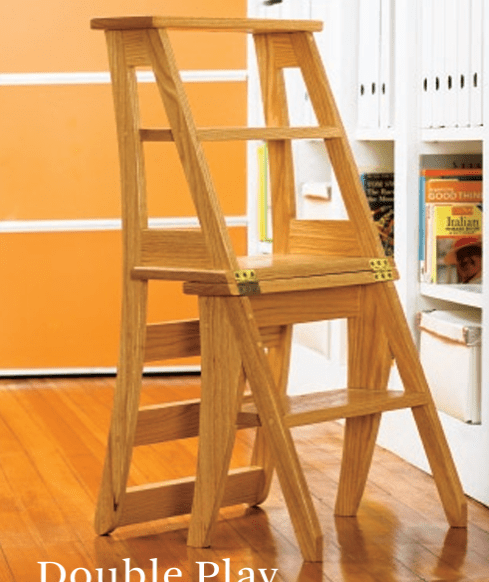
To illustrate the threshold problem, early in my woodworking career, I built a folding Ben Franklin chair for my mother. I chose the project based on the tools the plans required: jigsaw, circular saw and router. The resulting chair charmed my mother, but my critical eye still sees the flaws. Too many gaps during the routing, hinges chosen by price not design, the imperfect parts and a massive design change to help me in construction.

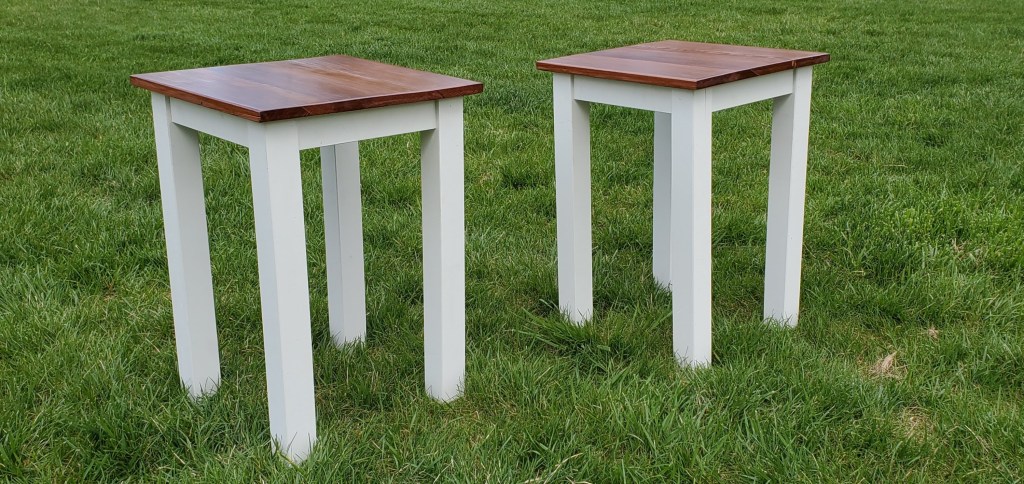
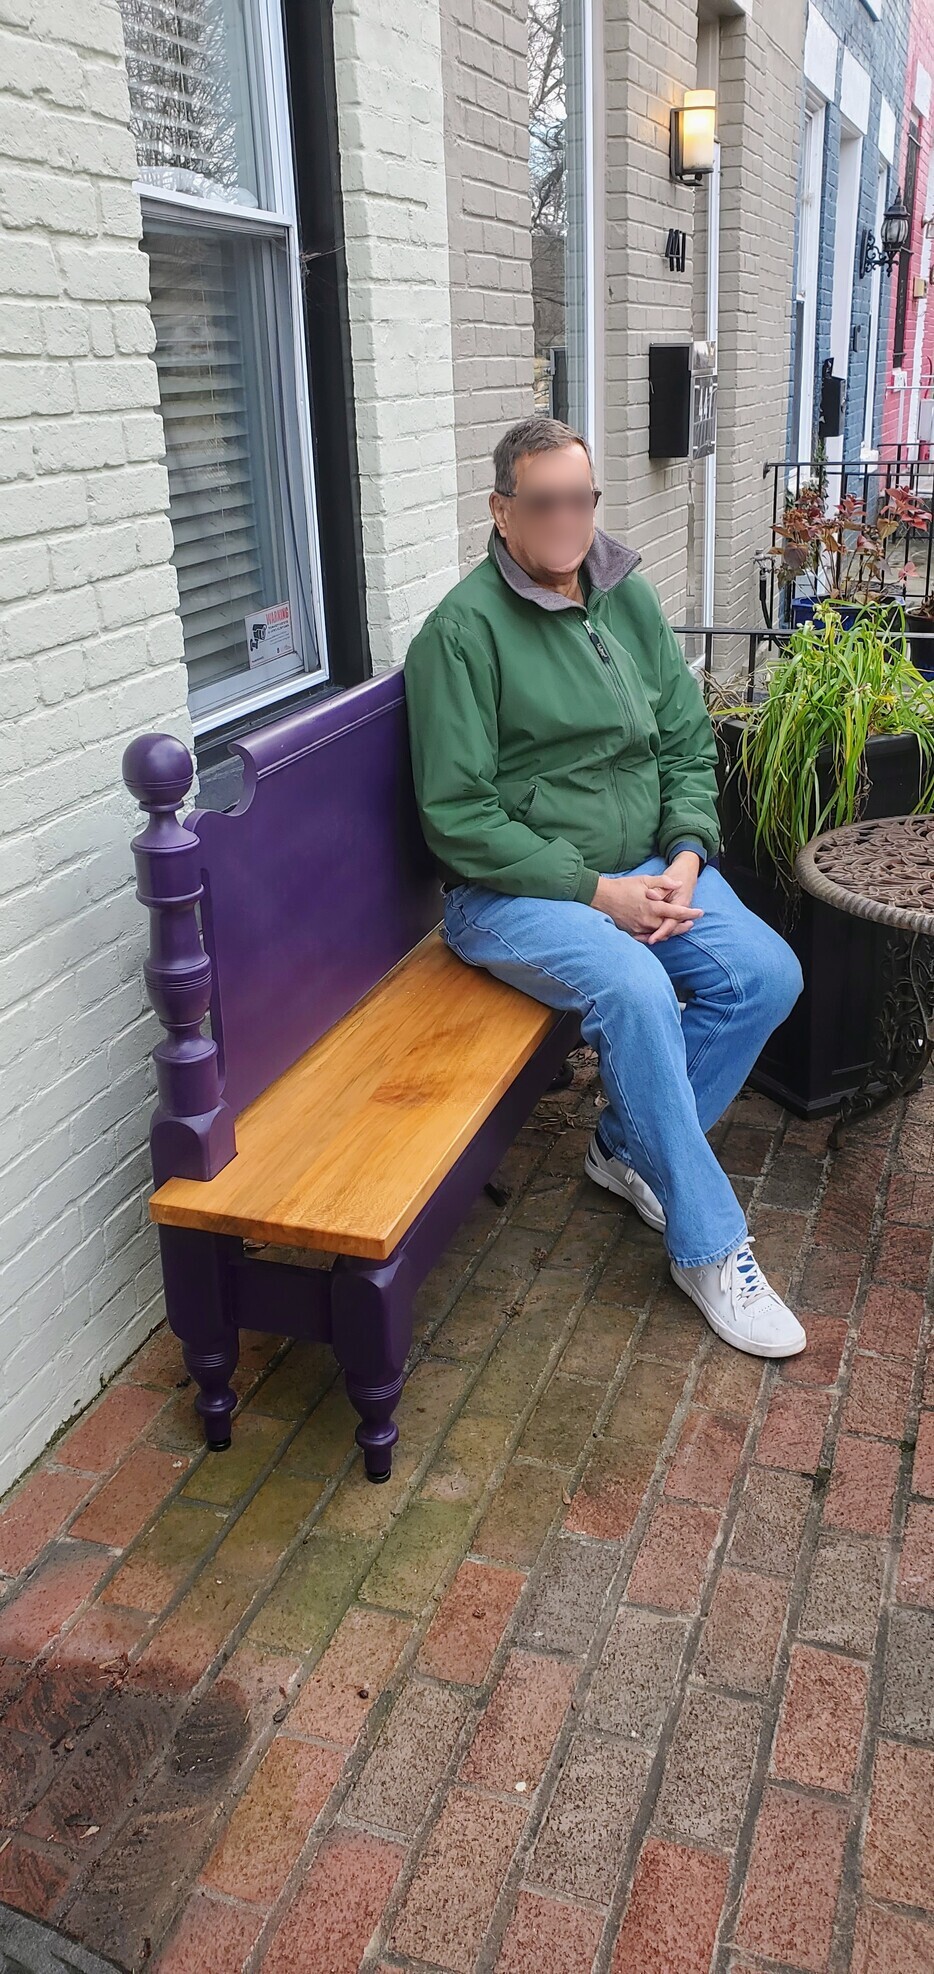
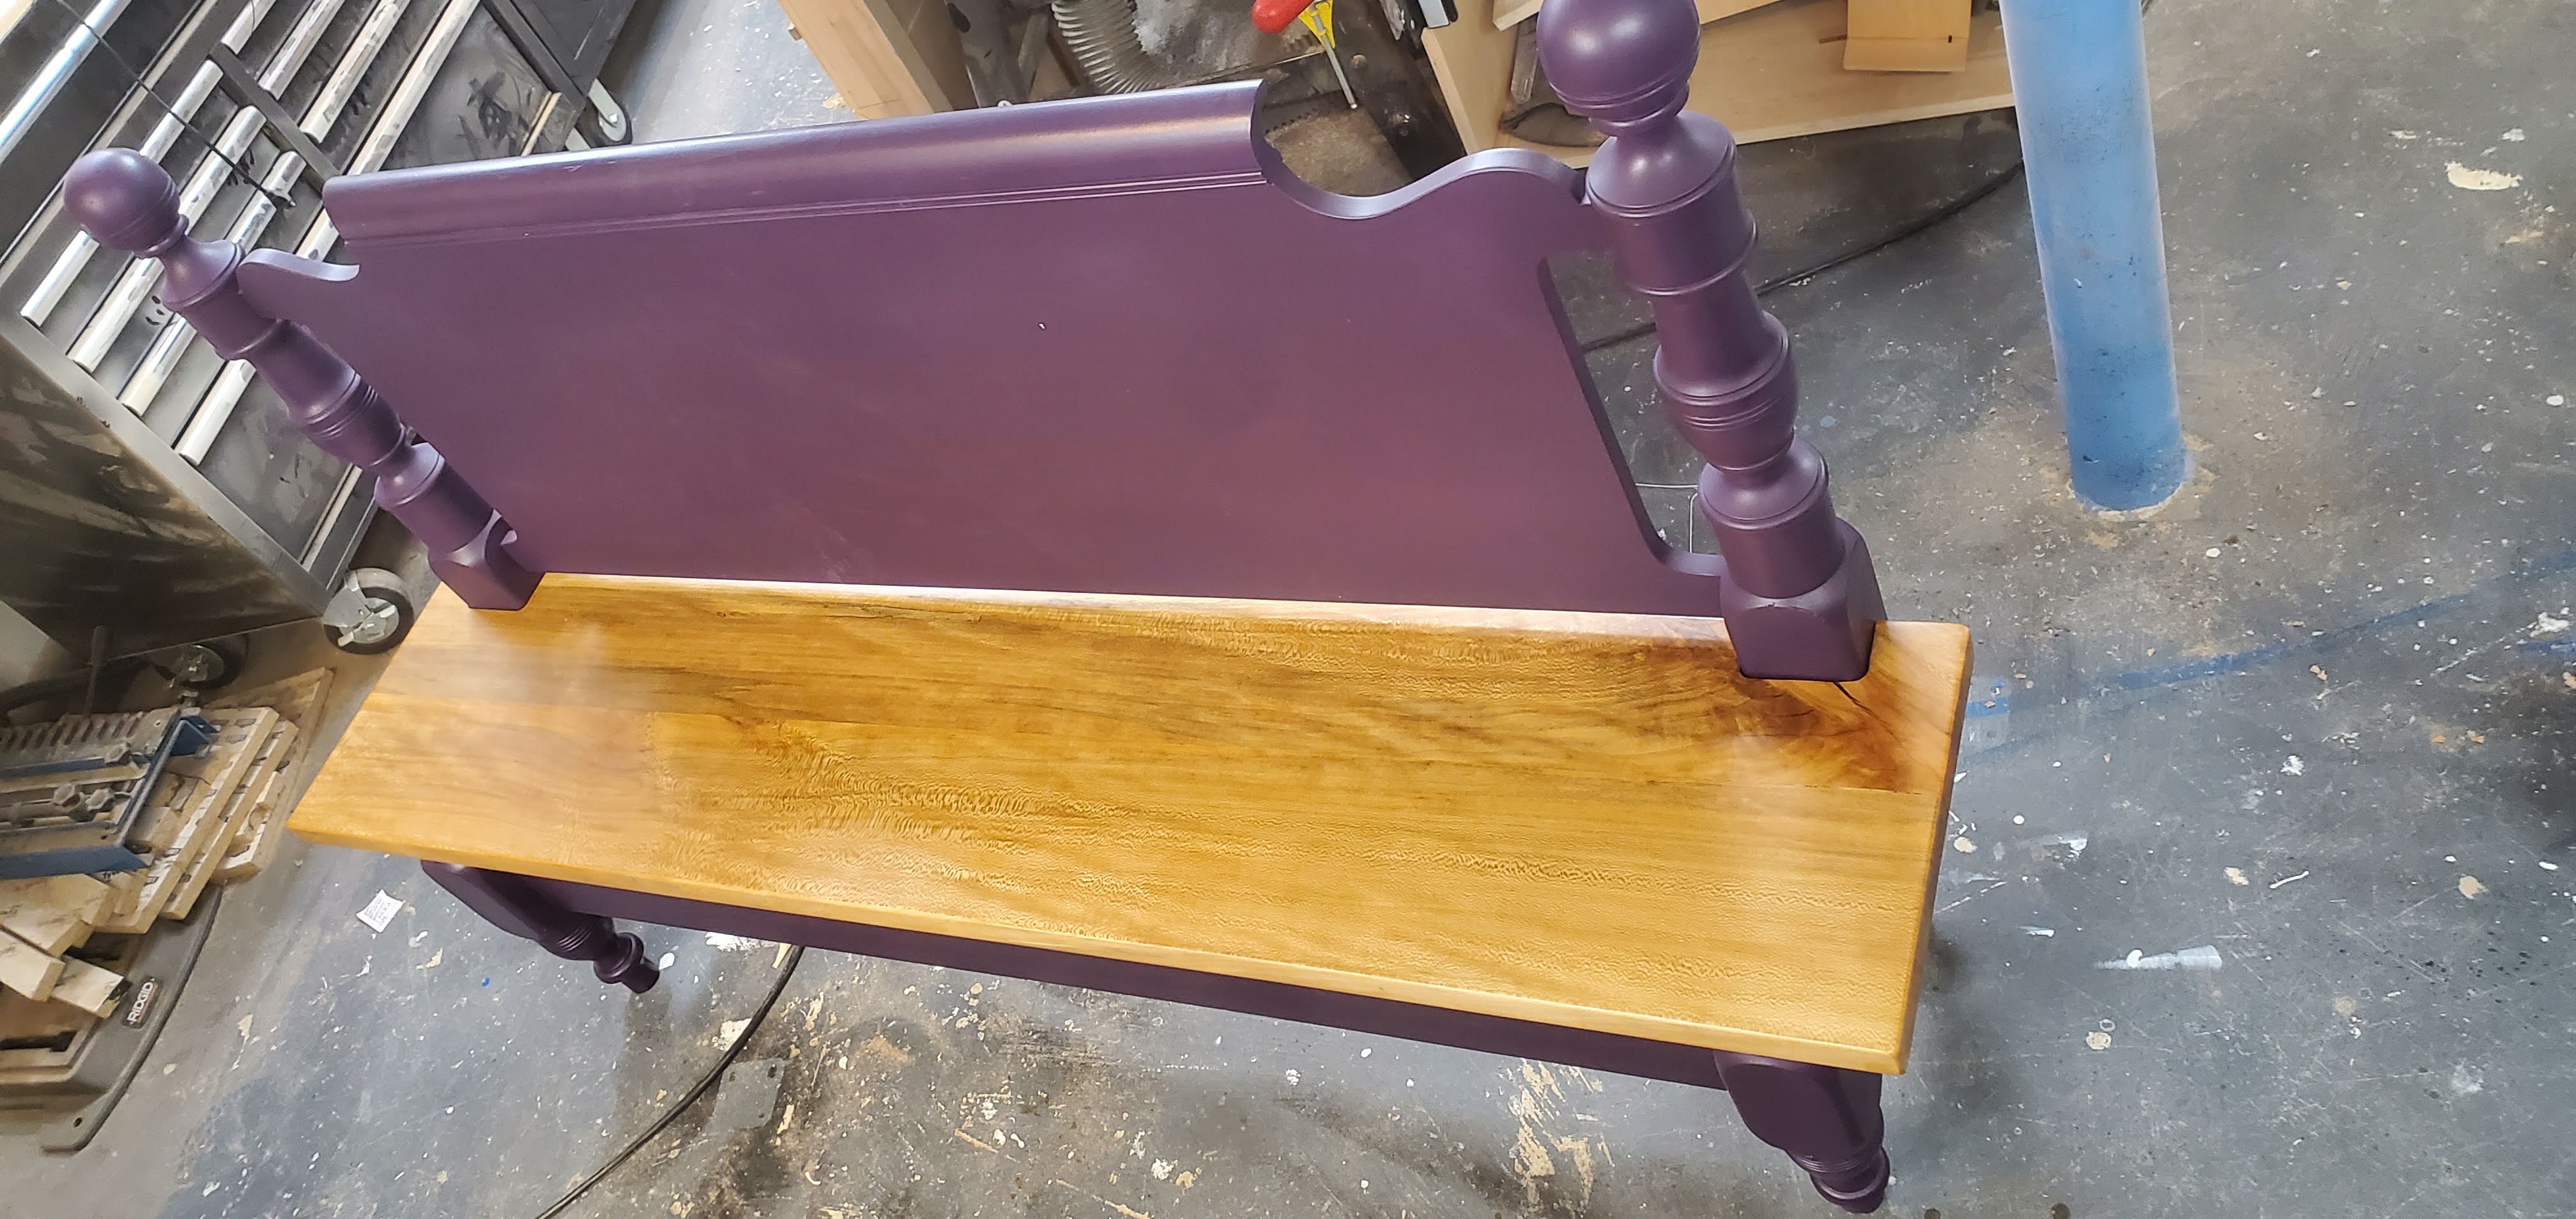
When I purchased my first table saw, I saw an immediate jump in the quality of my work – I crossed a threshold. My first nightstand built with that table saw represented a leap in my abilities. The nightstand has its design faults, but I was able to achieve something better because the table saw injected just enough oomph into my process to get me out of the world of 2x4s and 1x8s and into the world of rough sawn lumber.

Twin nightstands, made from poplar and reclaimed redwood for my sons. These nightstands represent a leap in quality – shorter fabrication time, better design choices and professional finishes.

The Threshold of Beginning: Striking a Spark & Keeping the Flame Alive

Every project begins with a spark – even if I end up woodworking in the dark. Clients, materials, machines, processes and objects have all sparked my work. To complete a project though, I need to turn the spark into motivation and will. For me, small successes during the process of fabrication create that motivation and willpower, that combination of factors some call discipline. Just like a 4-stroke engine, I need a series of small inputs – fuel, air and the spark – to keep going, otherwise progress stalls. AI lowers the amount of those inputs and improves my chances of success.

When something sparks my curiosity, I begin with research. In previous iterations of my research process, I needed access: mentors, libraries, tools, or knowledge networks in order to learn something at a deep level. Like the truth, I knew the knowledge was out there, I just often couldn’t find a way through the gate. I grew up in the 90’s and so I spent hours of my life page-surfing the encyclopedia and the written word. In college, I wandered the library and literary search engines looking for the perfect piece of evidence or quote for my wild ideas. The process was a struggle and my motivation and willpower gave in to deadlines long before I could flesh out my ideas. This slow process often produced uneven work; while the friction of my youth may have developed some of the muscles and discipline to work through a problem, it just as often, made the work conform to the limits of these constraints – just like my Ben Franklin chair years later.

With the advent of AI, my research flows far more naturally. Questions beget more questions – for example, a simple technical question such feeds and speeds for the CNC leads to troubleshooting code which leads to diving into different workholding techniques – while also allowing presenting the information in quickly digestible blocks of text, my preferred learning method. The links allow me to jump though the looking glass and digest the original sources to find a deeper, more complete answer. AI allows me to digest, verify, test and internalize new maker knowledge. AI compresses my research cycles and expands its boundaries, but doesn’t remove my judgement. Before, I was jellyfish floating through the ocean, aimless but growing. Now, I’m a shark. And there’s blood in the water.

In my work, four research inquiries reliably take my work to the next level.

  1. Archetypes & Forms (How does form invite function and vice versa?)
  1. Vocabulary & Grammar (How can I describe this project in ways that unlock a better understanding?)
  1. Processes, Standards & Parameters (How do I build this thing? What rules should I follow in its design? What tolerances are necessary for success?)
  1. Failure Modes & Pressure Points (How will I screw this up? How does this plan normally blow up? What am I not considering?)
A super fun piece of wall art which showcased my integration of digital tool and AI into my tool set. I used a combination of AI, vector graphic software and raster graphic software to manipulate the image and cut it into various layers. Printed on glossy paper, fixed with spray glue, lasered cut outs. Framed in poplar painted black, finished with wax.

The Threshold of Clients: Mockups Before Prototypes

As my practice became more client-facing, I hit a familiar wall. While I could build anything with my hands, I struggled to communicate my design while it still lived in my head. Physical sketches often lacked information that mattered, while even “quick” mockups ate up valuable time. Sometimes it’s just enough time to extinguish the momentum for either the maker or the client.

I often use AI to muscle through multiple iterations of mockups at a pace I struggle to match with more traditional software and workflows – especially during the delicate time as the client and I grapple with what the project will become. In this stage, the AI becomes a candle to see, not the painting on the cave walls. The danger lies hidden in the shadows – what we forget to look for.

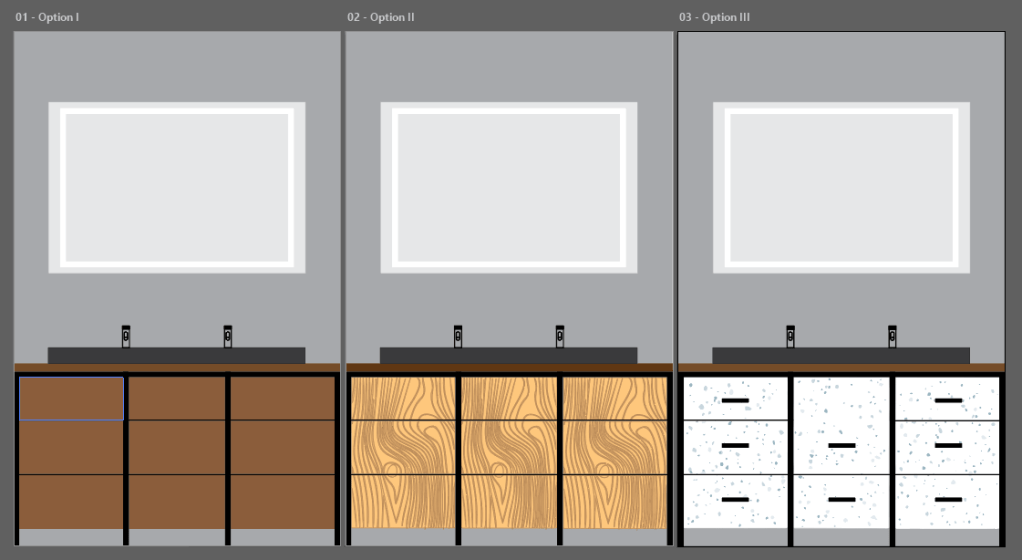
My most consistent client, my spouse, needs lots of visuals and communication before agreeing to a project. Recently we needed to refresh our house’s exterior. I prompted AI to mock up the house with several common color schemes pre- approved by our hyperlocal regulatory microstate enforced by pickleball enthusiasts. The mockups allowed me to spend the time where it really mattered: talking about what we wanted in the refresh and how to achieve it. That communication was the real work – not generating a perfect mockup.

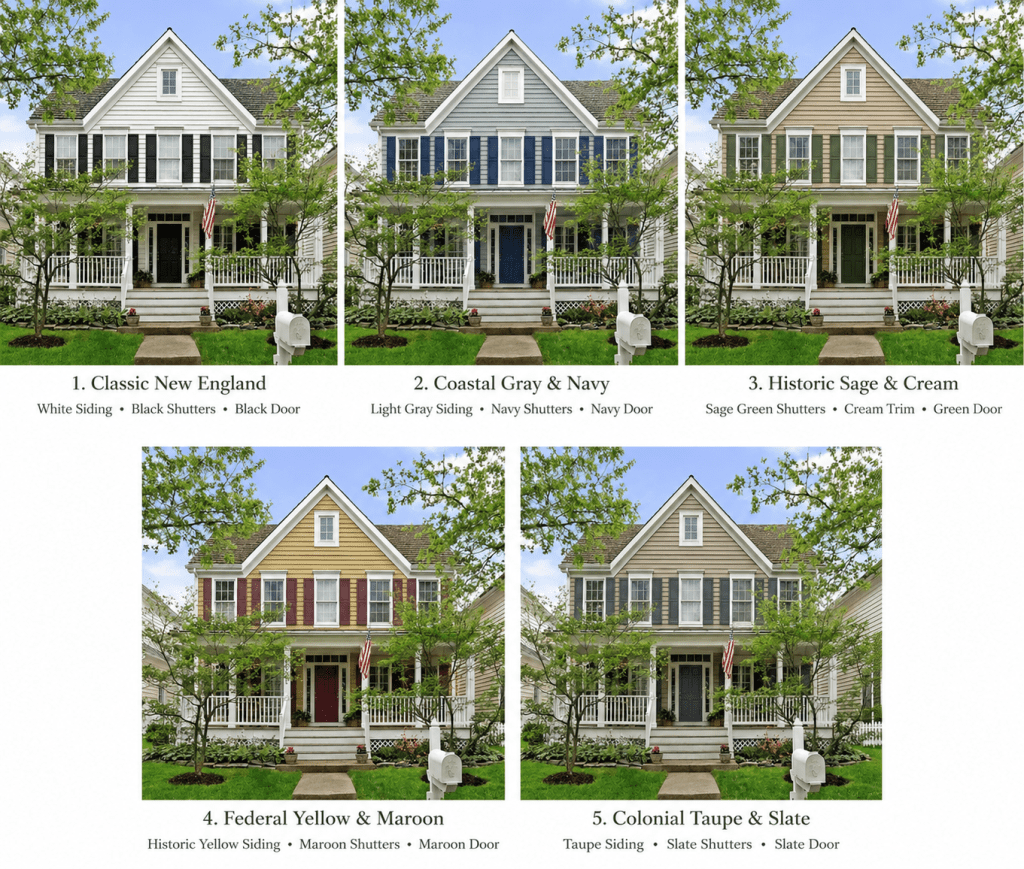
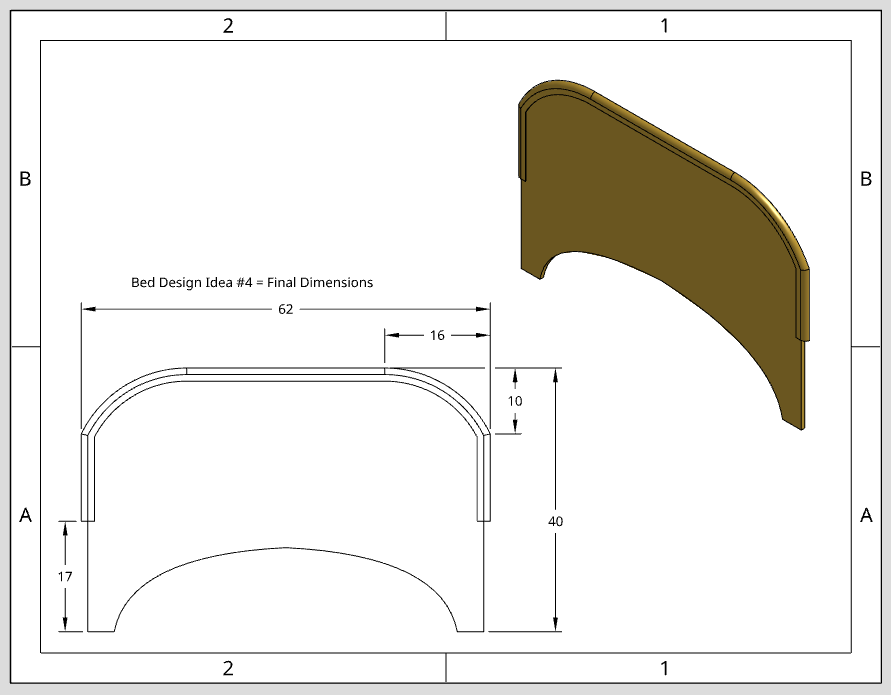
I can do polish, as the two mockups in Illustrator and Onshape show below. The polish is more effective for my process after my ideas have transformed into a rough visual language for others. But for the DIY’er, hobbyist or early-stage career-switcher like me, the dual drag of costs and skill can destroy momentum. The old tools still do the real work. AI just conserves my momentum through good-enough iterations to get feedback, make decisions and get making.

There’s a catch with AI – the visuals can anchor a client (or worse, me!) to a particular aesthetic, generate impossible or poor proportions and mismatch colors. Without a critical and discerning eye, reliance on AI can inhibit communication with clients as much as help. So, as best I can, I intentionally use the AI as my sketchbook, not the hand that holds the pen.

The Threshold of Institutions: Shop Floor to Corporate Office

A perfectly applied finish on a mahogany table or carefully constructed class contains its own pleasure, but I make, teach and write to connect with the world around me. The exact reasons why I’m fantastic in the shop or classroom – my humor, my use of analogies and metaphors, my wordiness – get in the way when I communicate to clients, customers, administrators, and managers who live and work outside the shop while often holding the decision-making power to stall or green-light a project inside the shop.

I earned the best parts of myself the hard way. In college, I studied creative writing. Here, I developed my own voice. As a teacher, I learned to leverage that unique voice to explain concepts to students in a personal, interesting way. Yet when I moved into roles requiring more professional, corporate tone and language, I simply did not have the mindset, language or feedback loops necessary to turn a proposal into sawdust and cash. That pesky threshold problem presented itself again – this time in how I market the thing, not make it. I spent years learning how to ideate, create and explain on command under a time crunch to an audience hungry for connection. Now, my audience changed and I needed a translator. I needed my written word to code-switch, quickly and just-good-enough, into formal corporate language. My paycheck depended on it. For years, despite trying and failing and trying again, I couldn’t get signatures and scheduled programming. I needed a different tactic and a new tool to get the results I wanted.

Now, the AI acts as my translator from shop-talk to corporate-speak. Notes, bullet points and irreverent references to Bruce Springsteen songs become fleshed out sentences and blurbs with clear, consistent formatting written for an audience with very little time or inclination to engage with my idea. AI helps me move proposals from verbal brainstorms and explorations with the client and my own team to signed contracts and approved programs in institutional settings. Most importantly, the decision-makers in my orbit have begun putting cash, time and sweat equity into my ideas.

Below, I track the progression from my brainstorming notes into a proposal and soon-to-be delivered workshop. I consider teaching this workshop my white whale; the proposal is just the harpoon. Unlike other similar offers for similar training earlier in my career, this time I harpooned the white whale and brought him in. The difference was using AI to quickly package my ideas in a clear, comprehensible way for non-sailors and non-teachers alike. I didn’t need to practice sailing, I just needed a sharper harpoon.


(Pre-AI, Notes on CTE Training):

Issue:

Teachers entering CTE (Career and Technical Education) often lack fabrication experience – safety and quality suffers.

School district needs more than tool specific training; pedagogical, classroom structure, management (project breakdown, project demonstrations, jigs/fixtures, classroom roles, etc)

Proposed Solution:

Offer training to new/intermediate teachers in:

  1. Fabrication – woodworking specifically
  1. Machine safety
  1. Pedagogy – logistics and technology of teaching woodworking and process of fabrication

Logistics: Multiple days/two sessions per day, rotate cohorts of 10

(With AI, Audience: Administrators & Teachers) Fabrication Training for CTE Teachers:

A single 8-hour intensive that builds confidence on core woodworking machines while also helping teachers translate shop skills into classroom-ready projects. The day is split between hands-on machine training in the woodshop (bandsaw, table saw, miter saw, jointer, plus demos of drill press, drum sander, planer, and air nailers) and a facilitated design-thinking workshop focused on materials literacy and rapid curriculum prototyping in grade-level cohorts.

Of course, I notice (and grieve) how my voice is stripped away and replaced with the anodyne malarkey of corporate-speak ready for easy digestion by the client or manager. I’ve resisted for years the pressure to be complicit in compromising my voice for the simple making of a product. The AI lowers the threshold just enough to get the proposal to the finish line and me back to doing what I do best – making, writing and teaching in the shop and classroom.

Professional language reminds me of my high school German – I can read it at a far higher degree of fluency than speak or write it. AI takes rough-and-ready ideas and language – ideas and language with its own beauty, purpose and value, mind you – and refines the lines, softens the edges, sharpens the focus and translates my intentions to unfamiliar audiences without forcing me to assimilate my hard-won voice into corporate culture. The tone and register on the page may change with AI, but my values and intent remain in the classroom and shop floor.

The Threshold of Execution: Into the Cave

Now, we’ll travel into more and more problematic uses of AI. In the previous examples, I clearly kept my hand on the tools of fabrication and design choices. In the next examples, I more and more use AI to substitute and augment my own skillset, risking my authorship and atrophying my developing skills.

Every maker has a skill gap across the various disciplines fabrication employs. As a maker who never took an art class since middle school, understanding the visual composition and language of design has been a block for many years. Smart use of AI helps me move from idea to object without getting stuck. I may be able to see the faint cave painting, but the shadows get thick.

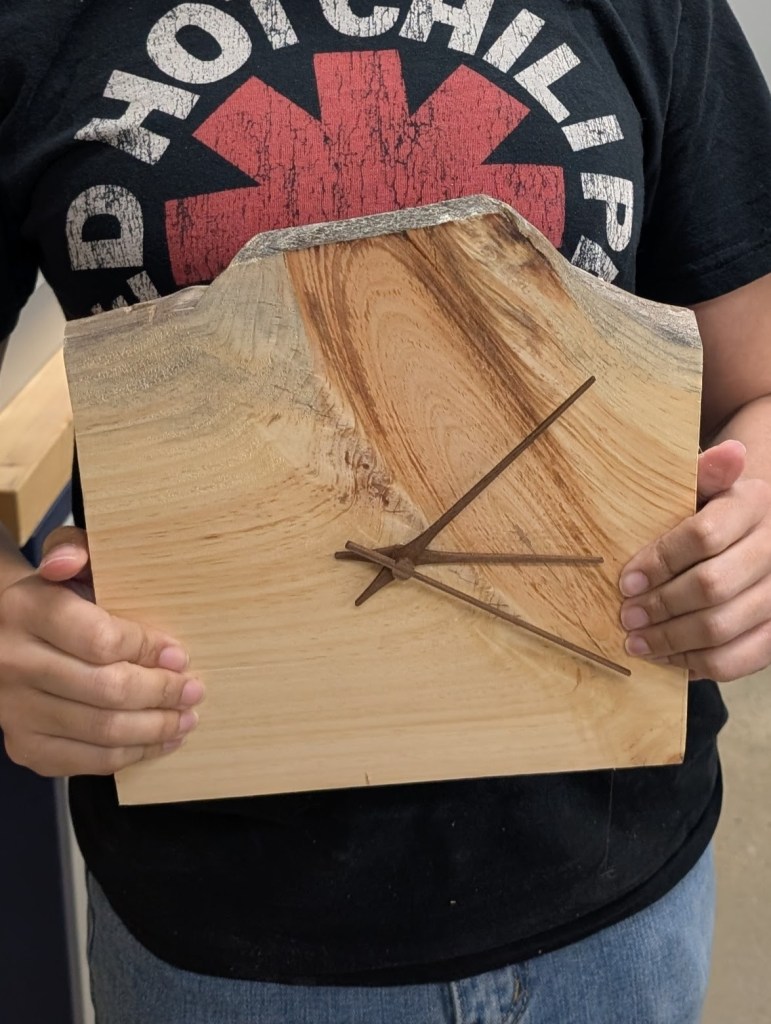
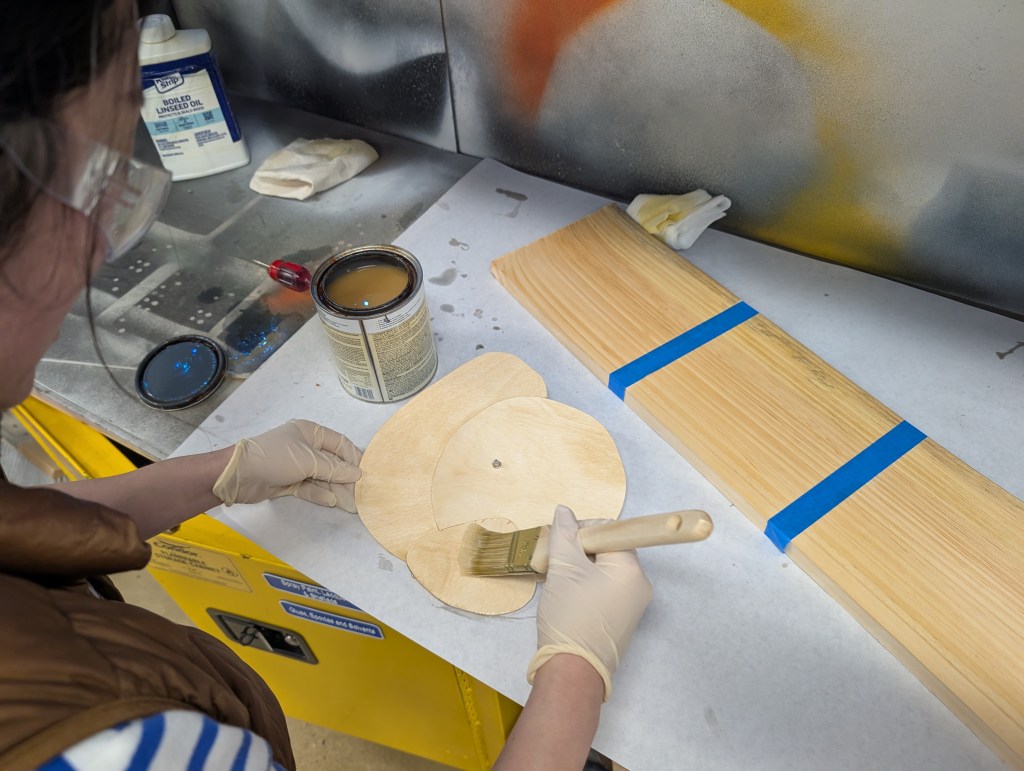
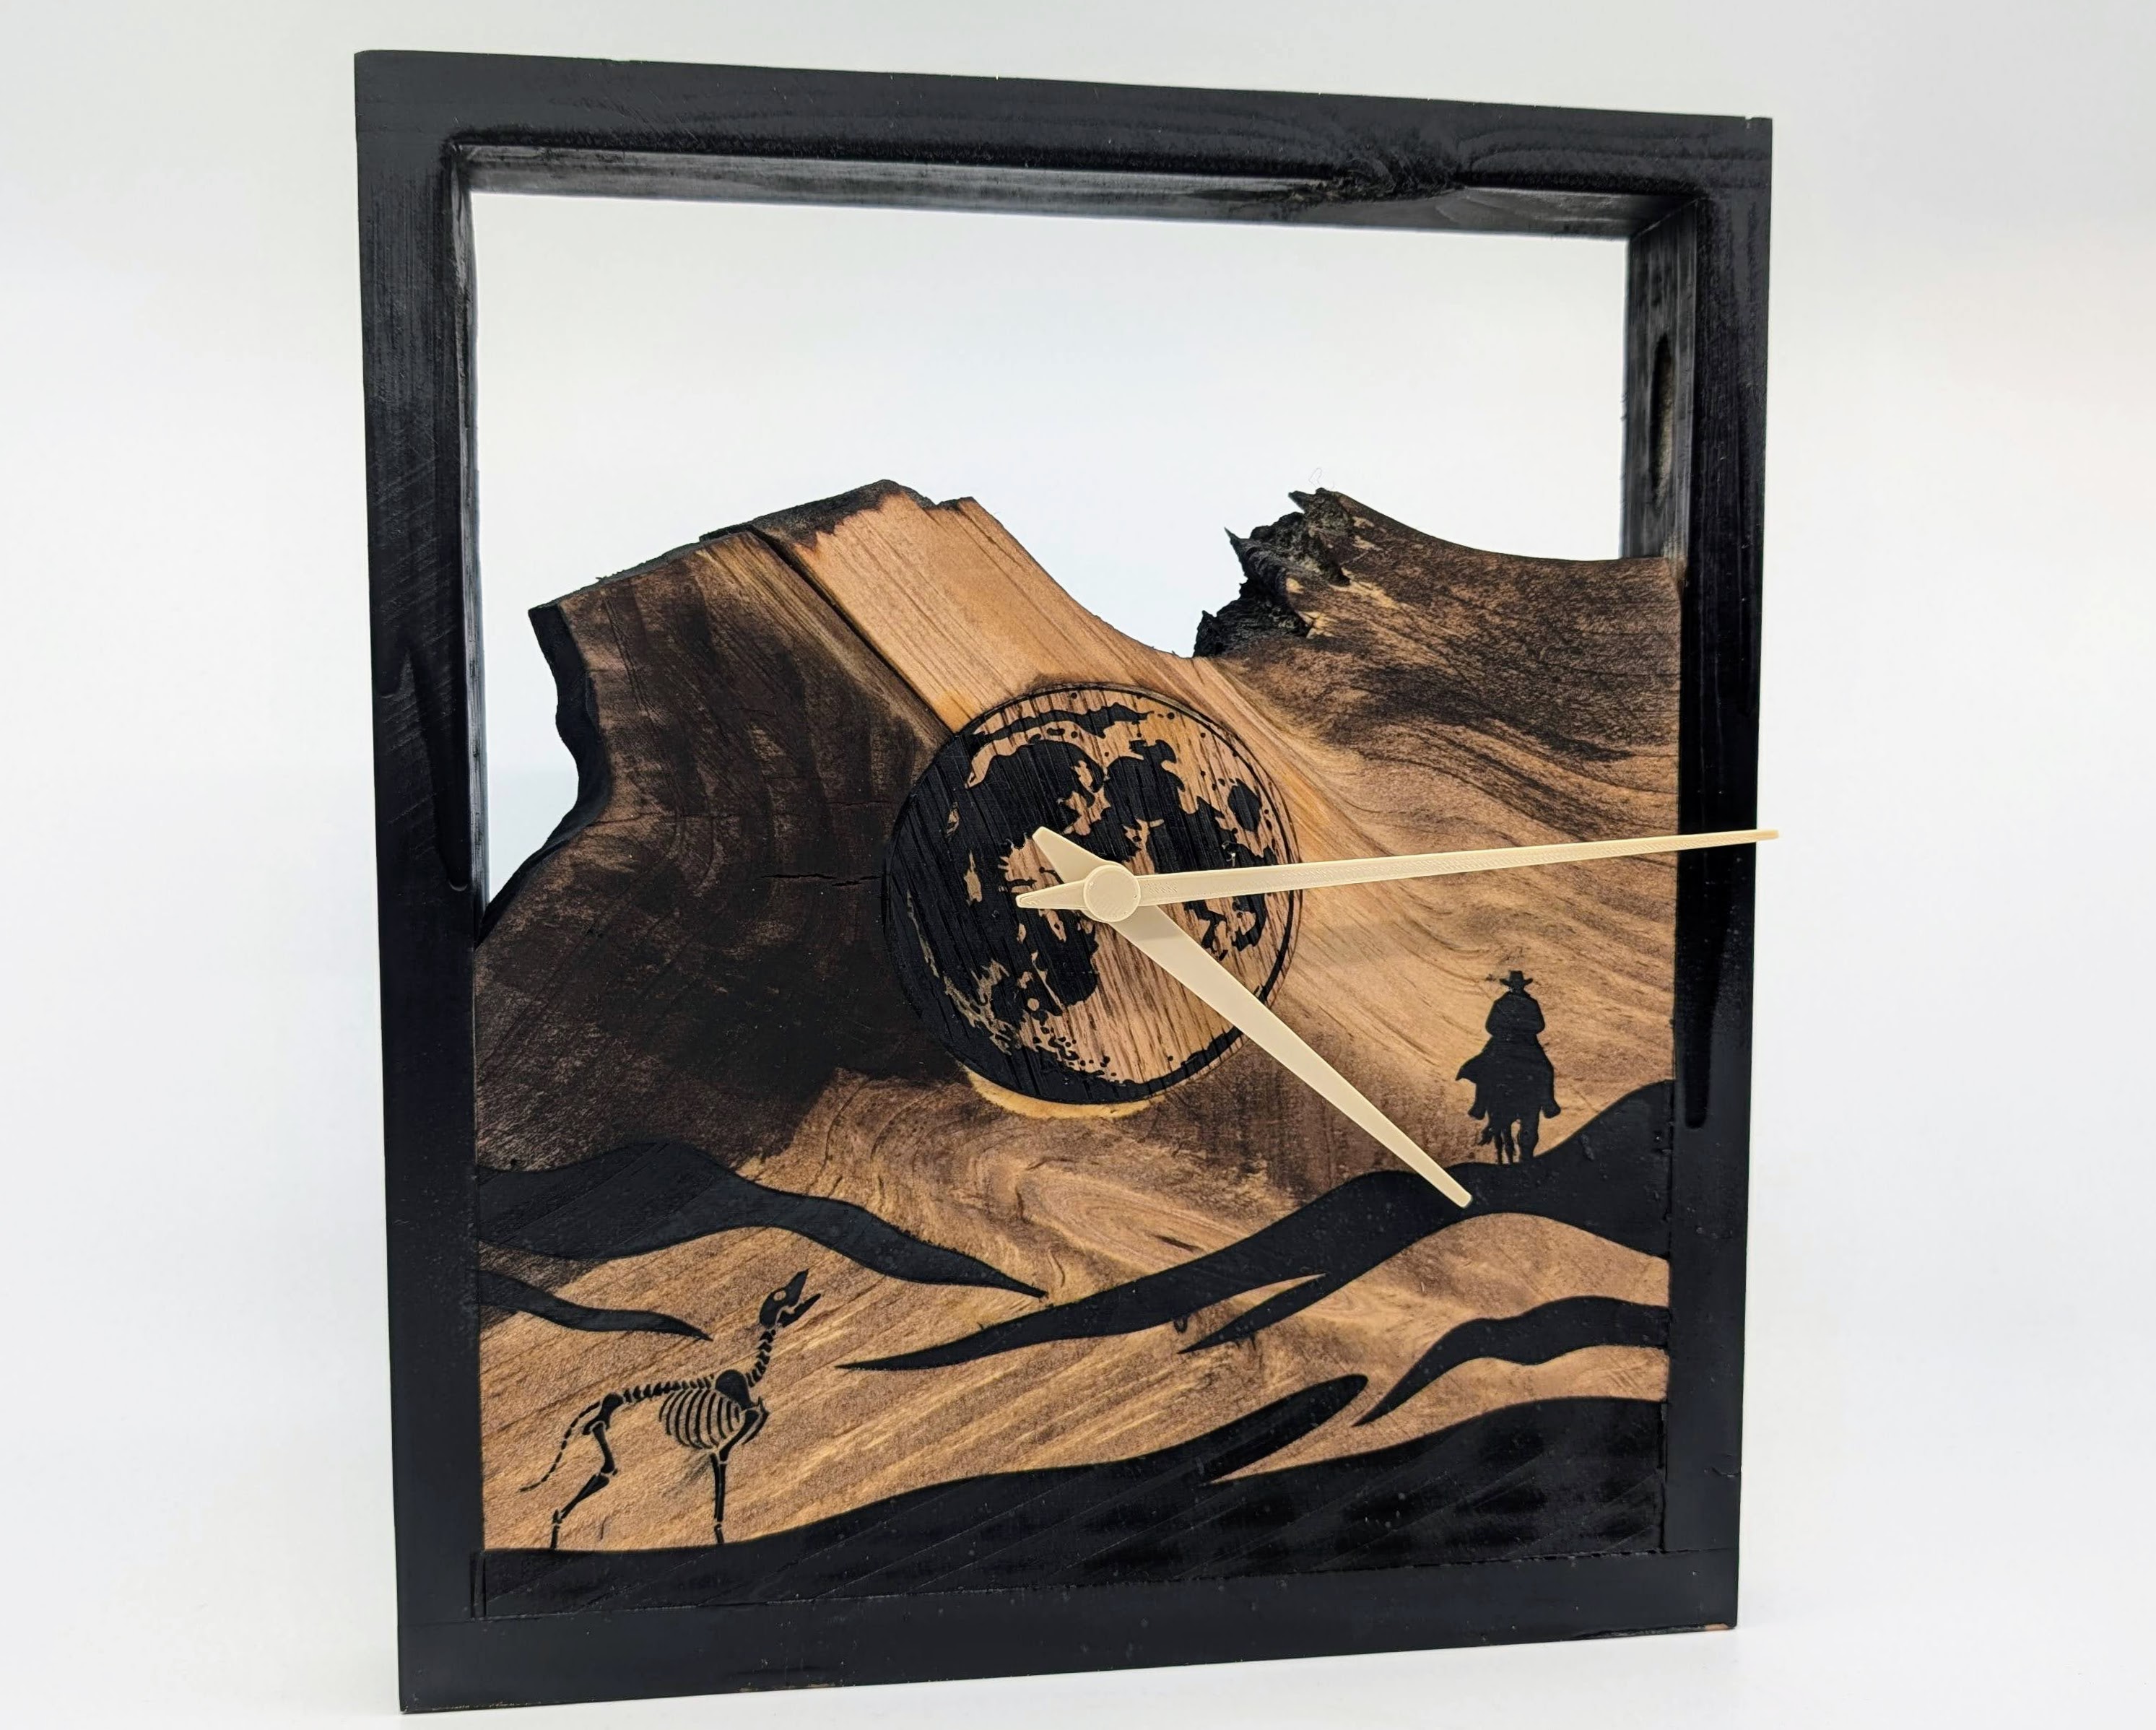
In the project below, AI was instrumental in moving the work from idea to object. This wall clock was the working prototype for tool training at an educational makerspace. Students could create wall clocks consisting of a wood frame and plywood tops. I wanted to incorporate the organic shapes and colors of wood, but bright yellow of pine didn’t really excite me. I wanted something with more visual oomph. Inspired by American Western literature, I prompted AI to create a desert scene with the horse rider and canine skeleton.

The real work was understanding the shadows. The image required serious refinement. I needed to tweak the prompt and used my vector graphic skillset to move the rider around, create the moon and arrange the elements as I wanted. I lowered the nodes, smoothed the curves and scaled the work to fit the stock. Lastly, I chose the section of pine slab to represent a mountain and stain to match the vibe.

The students took the inspiration and ran with it. Some liked the slab look, some took inspiration from the vector lines, some created multi-layered constructions with organic shapes. AI took a visual, inchoate idea and gave me just enough geometry to inspire the next move.

The Threshold of Prototypes: Forging Collaboration and Connection

Computer science (and coding) has always been a bit of a black box for me. I can certainly create games in visual languages such as Scratch, comfortable reading Python and JavaScript, and have put together Arduino based robots and kits, but creating software, tools and machines based on my personal ideas and prompts has been a stumbling block. In my sleep, I build machines, some even needing software. But no one truly ever wanted to hear about my dreams. I didn’t need a team, a pitch deck, black turtleneck or road map – I just needed a prototype to see what worked. Enter my vibe coding era.

Vibe coding allows for the jump (and not just for me) from idea to operational prototype. In my experience, vibe coding isn’t plug and play – I’ve worked in Python, JavaScript and HTML through Claude, ChatGPT and Notion and none of the code produced worked on the first go-round. It takes a good amount of troubleshooting, some coding knowledge, time and sometimes a few dollars to make everything work consistently. I am happy with the results: real programs that perform the real tasks I need them to perform.

Fabrication, no matter what the process, material or product, often requires unique solutions to unique challenges. Vibe-coding, by lowering the threshold from coding to finished product, allows a maker to develop custom digital tools for custom needs.

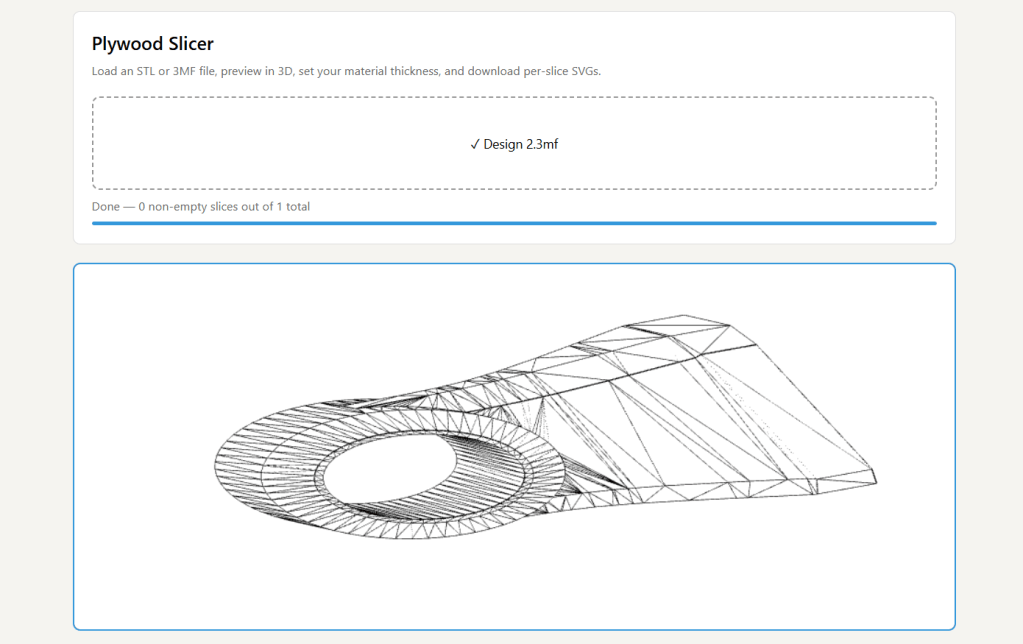
For example, I have always dreamed of creating large scale sculptures but often have stalled out due to various skills and knowledge gaps, such as how to CAD organic shapes and how to easily turn those shapes into physical objects. 123D Make was a program developed in the early aughts which could slice meshes into thick layers, such as 1/8th in, then exports those slices as SVGs for use in a laser cutter or plasma cutter. Unfortunately, Autodesk abandoned the software in 2017 and split the feature set between a variety of products and behind several paywalls. With AI, I successfully replicated several core features of the program so I can create a large scale sculpture.

The benefits didn’t stop there. I took my rudimentary prototype and showed it to other makers, makers with real expertise in computer science. Those makers suggested various improvements, turning a personal project into a collaborative effort. The more I study how things get made and get done, the more I find that big, interesting projects don’t happen by happenstance – they happen by deliberate collaboration. Just like when I delivered an AI-augmented wall clock or AI-translated proposal, AI was the tool needed to lower the activation energy necessary to get my idea from in my head to my hands and most importantly, over to collaborators so the idea could grow.

You can try the Plywood Slicer here!

Plywood Slicer slicing a bracket.

Stepping Over Threshold with AI: It’s Thresholds All The Way Down

Thresholds change as a maker grows. I once got stuck moving from an idea or sketch to viable process. Then, I got stuck executing the craft. Now, the threshold has moved to the middle of the process, hidden between in details of taste and design – the precious alchemy of materials, forms and processes that evoke emotion and connection between myself and others.

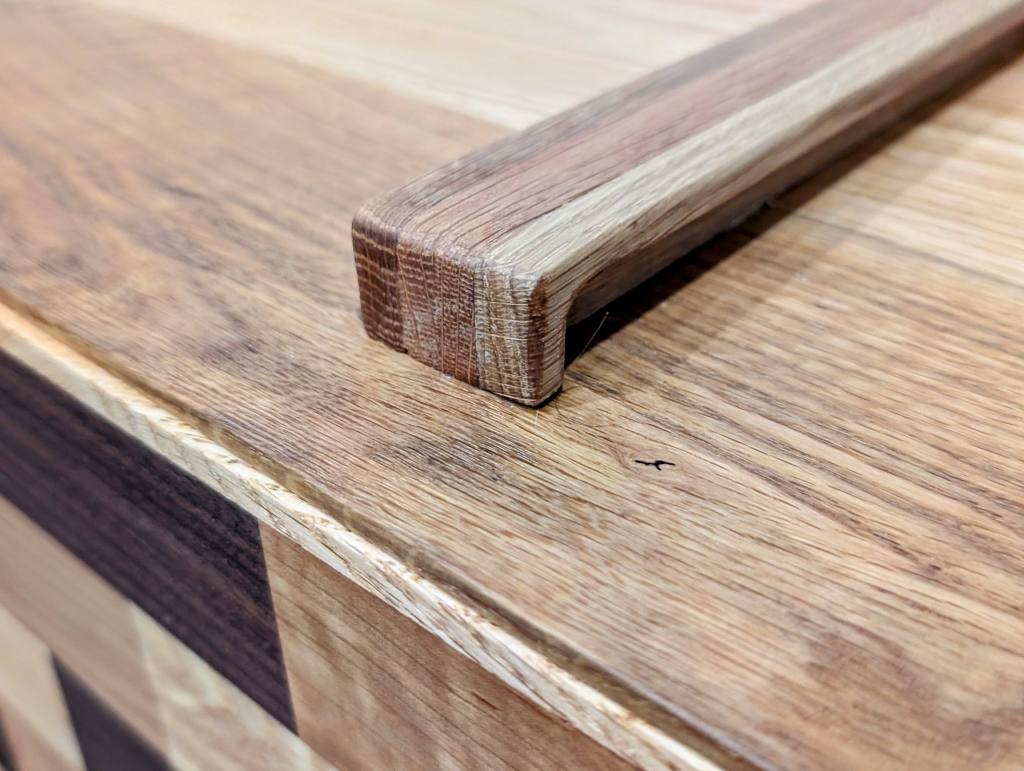
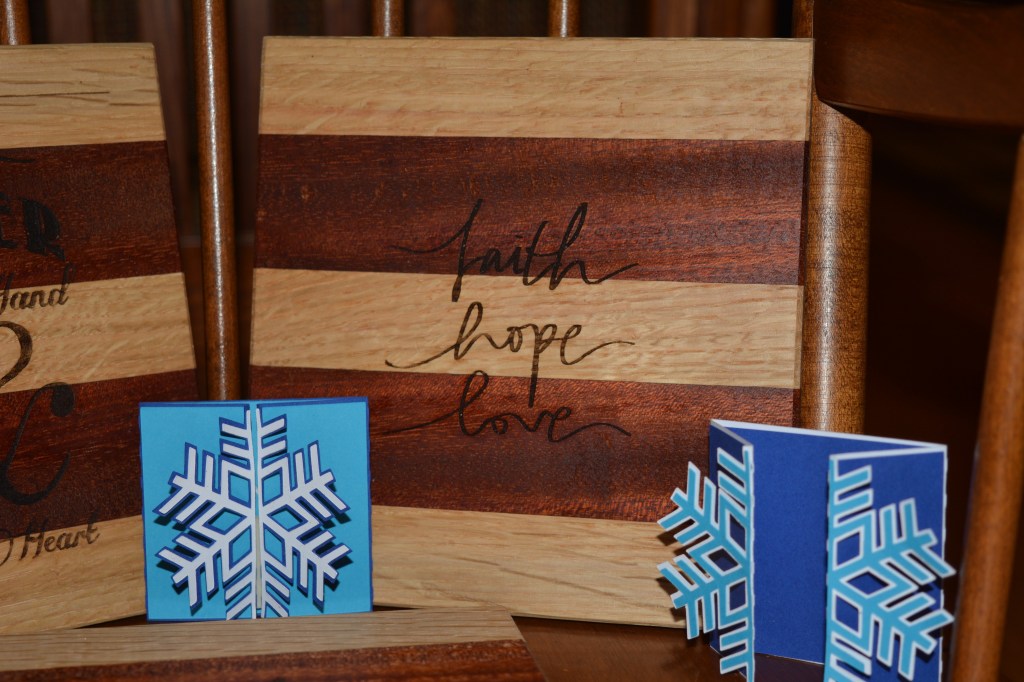
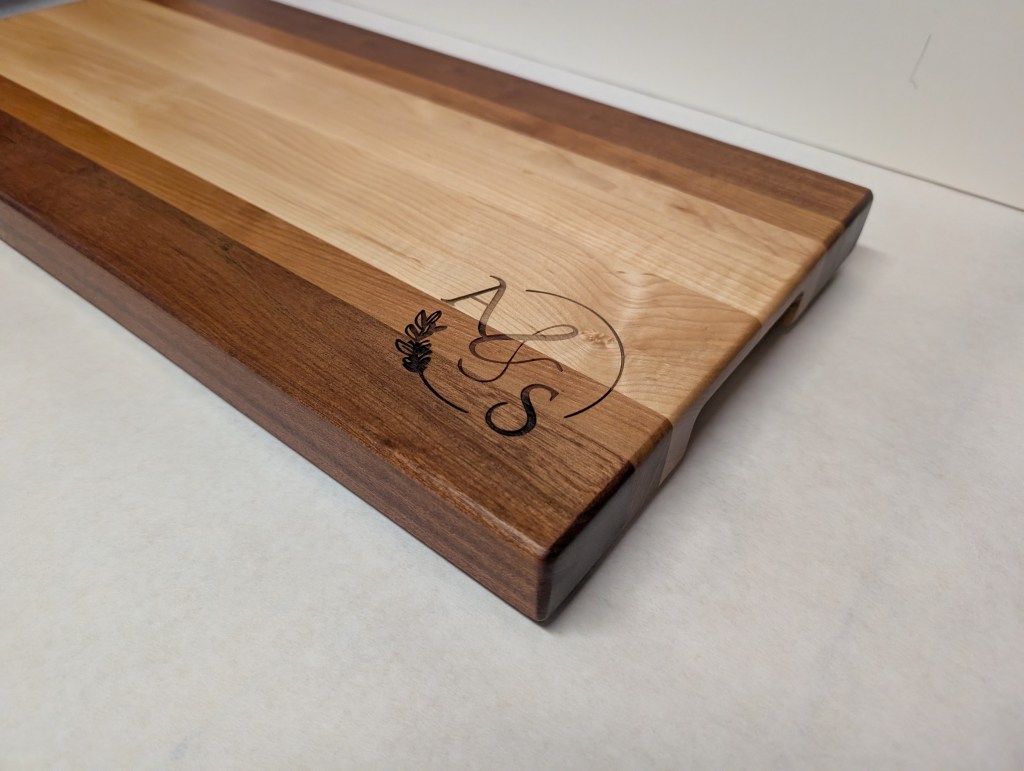
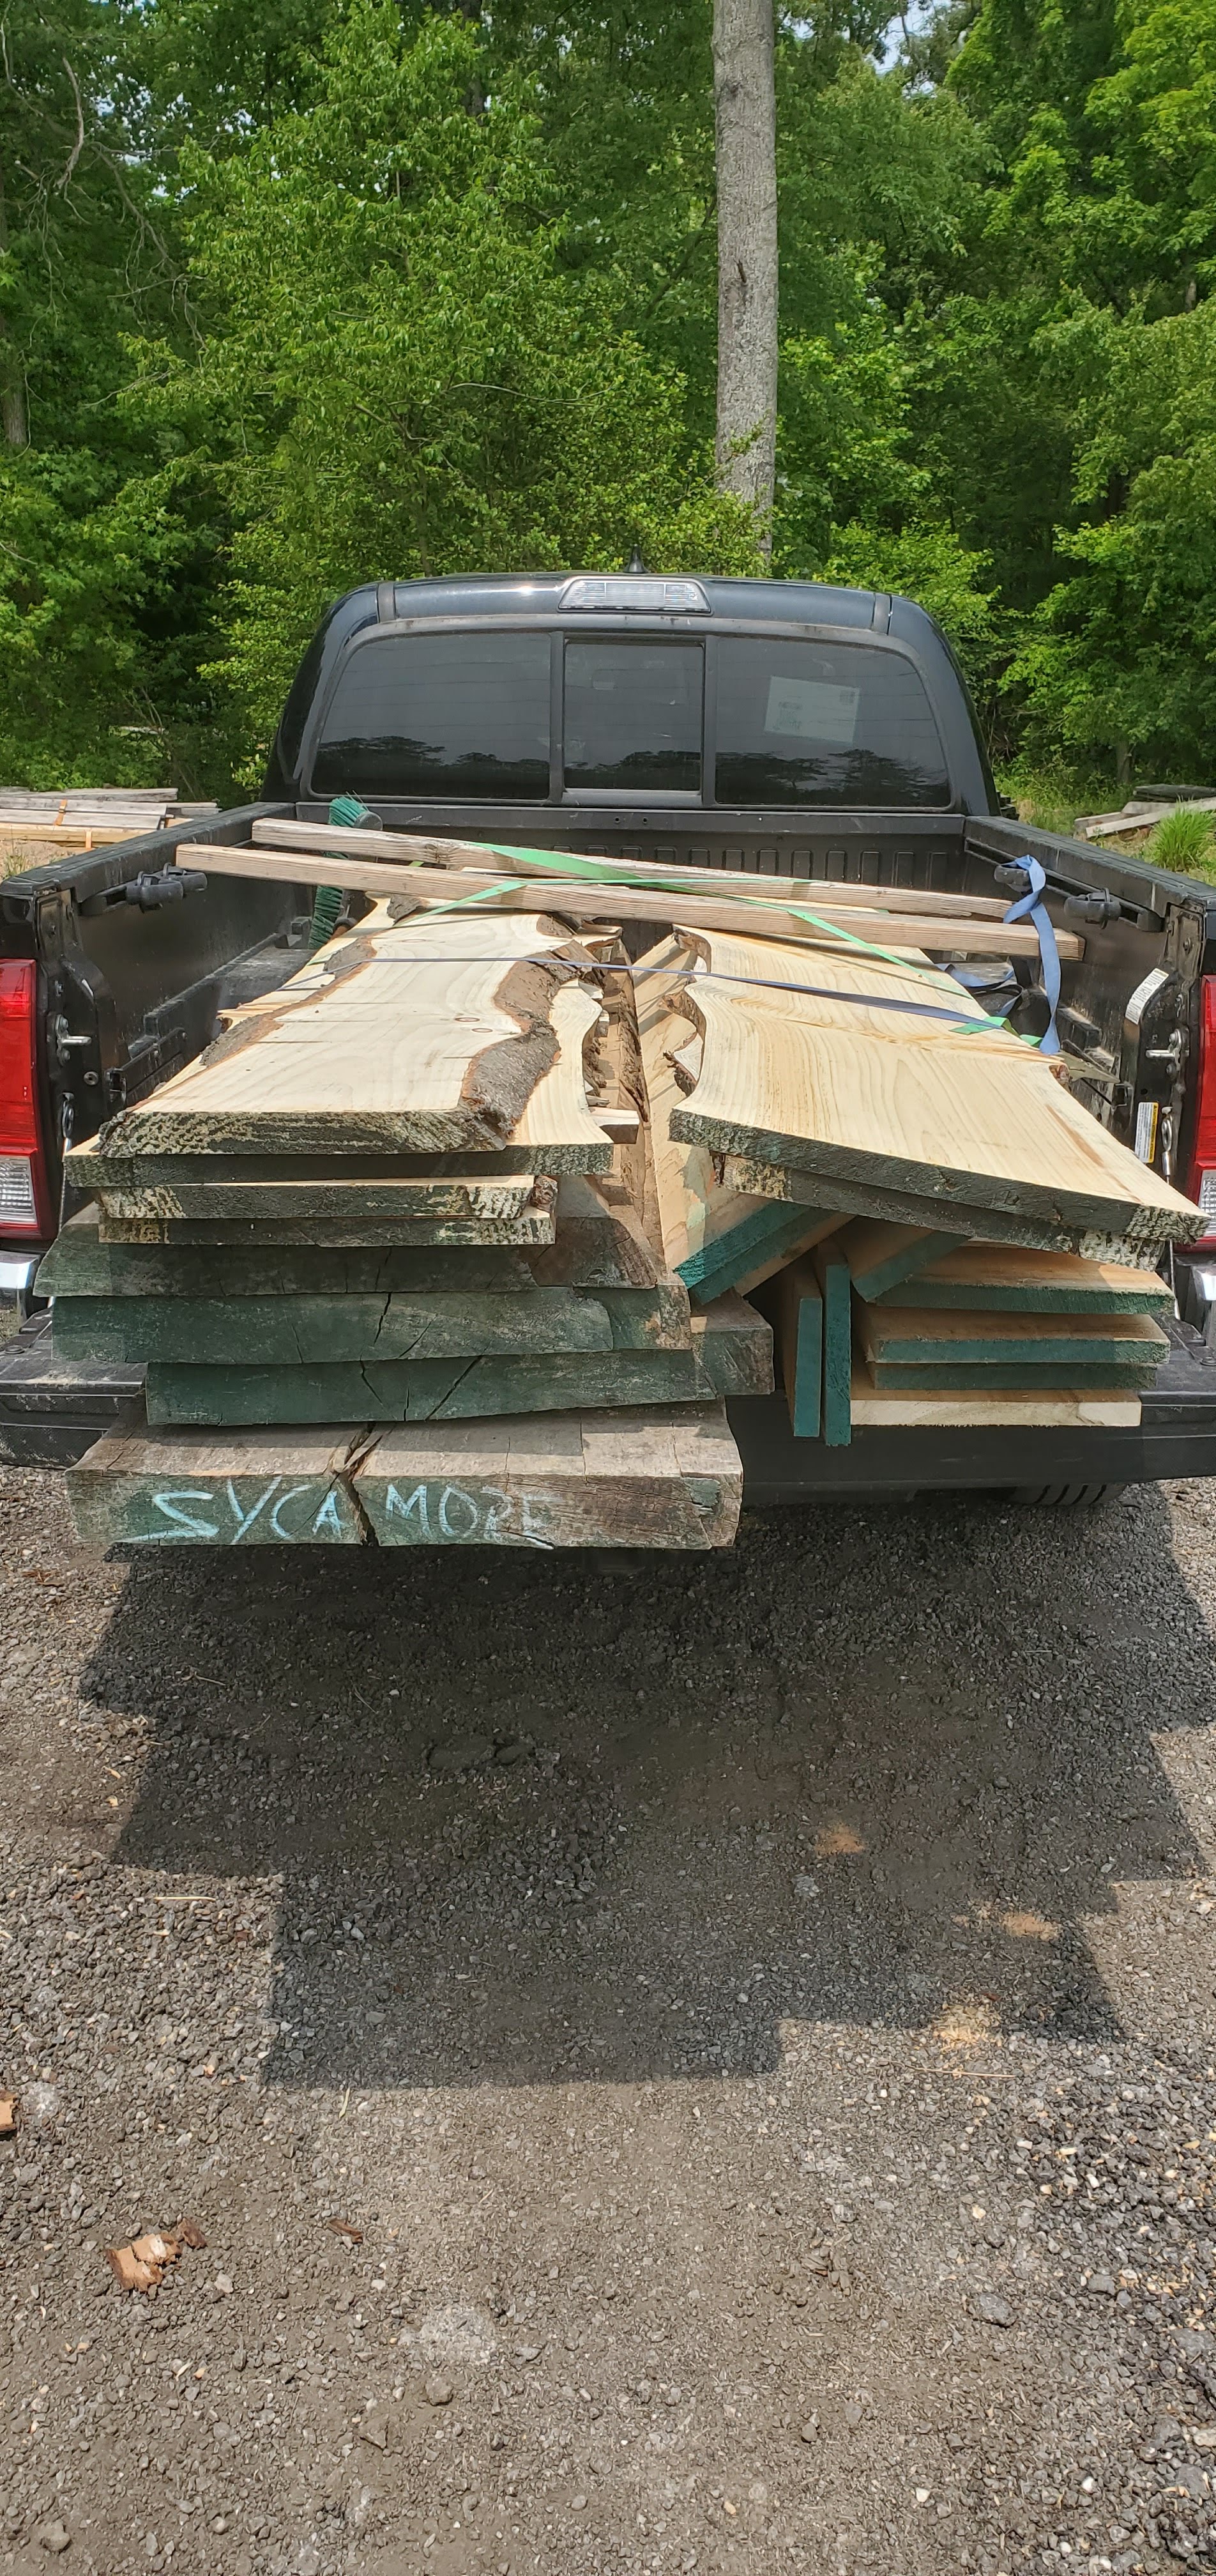
As I’ve described, my process begins with the spark. The spark often drives the objective of my project and the series of choices I take on the journey to completion. Early in my craft, those choices were instinctual and driven primarily by my skill, tool and material access. Now, I am much more intentional, open and deliberate in my choices. I choose my materials, finishes, forms and processes to express my vision rather than my product expressing unseen constraints. My proof is in the work. Contrast the trivet from my early days with a recent cutting board. I’m happy to see the improvement. I just wish it didn’t take so long to get there.

Incorporating AI into my maker process has felt a lot like incorporating my first table saw into my workshop. It took up lots of space. The machine bristled with danger, so I used it sparingly at first. It took some practice before I could make the tool sing.

Most importantly, it made making furniture easier for me and the result more legitimate for my intended audience. The Ben Franklin chair told a story of a maker experimenting and learning. The nightstand, on the other hand, earned its place at the side of the bed. It didn’t need a mother’s relationship with her son to be loved. It just was.

AI works like the table saw in my workshop. It does not make me a furniture maker or even a designer. It just helps me move across the threshold from my head, heart and hands into the space between myself and the audience. In the end, it is just a tool. My skill, craft and intentions determine the result.

This pen and case mixes multiple technologies and techniques to achieve its intended effect: WOW! The pen was turned from ebony. The case is hard, curly maple with ebony accents placed at a bevel to emphasis movement and power, while a simple brass pull and magnet clasps. Last, but not least, the pen is held in place by tight tolerances and 3D printed brackets. The outer shape and pen cavity were made on the CNC router.

Lowering the threshold with any tool or technology comes with unintended consequences. Digital tools and CNC technology removes certain hand skills from fabrication. Mentors can help move an idea to completion, but also imprint their own habits and judgement in place of the maker’s. Institutions fund and legitimize a maker’s efforts but often erase our fingerprints and tool marks.

Without understanding the connection between your skill, your intent and your voice, and a holistic integration of each component into yourself and then to the audience, a maker can’t become the best version of the maker they want to be. This is the mindset I try to cultivate in the shop – integrating what works on the workbench, the feedback from collaborators that sustains my soul and a new focus on getting the project into the hands my audience.

AI certainly lowers the activation energy needed to produce a piece of work, but relying on it without a the critical eye and wisdom of real-life experience and struggle lowers your maker’s ceiling, just like trying to cut a straight line using a handsaw without a hand plane or rule only creates frustration and broken joinery.

Making – and least the way I do it – is a high wire act of service and connection to the world, with lessons sometimes written in blood and silence. But I continue to make none-the-less.

Where To Buy Wood in Virginia, Maryland and Washington, DC?

Woodworking Resources in the DMV

To start, we need to define what “wood” means. Places to buy “Wood” come in several flavors to serve different industries. For woodworkers, we have several kinds of wood:

  • Hardwoods: Lumber harvested from a forest and cut into usable sizes, usually 1” – 3” thick, with no bark and one or two relatively straight edges.
  • Slabs: Larger sections of a tree with two “live” edges that often still has the bark on it. Can also be made from more exotic sections of a tree, such as a burl, a crotch or the root ball.
  • Sheet Goods: Large, flat and dimensionally stable engineered wood products made for applications where solid wood is an inappropriate material choice.
  • Construction Materials: The raw materials for building a dwelling or large structure, including wall studs, joists, beams, concrete, doors, windows, etc. Often, the studs and joists are made from softwoods, such as pine, fir and spruce.

Lumberyards stock …. lumber. Whether domestic or exotic, hardwood or softwood, lumberyards sell high grade, valuable wood used for fine furniture, household goods, art, etc. Great lumberyards will often carry woods such as oak, maple, walnut, birch, elm, padauk, sapele, mahogany, ebony, etc. The wood is often sold in the “rough”, meaning it still has the saw marks from the mill on it. Most lumberyards sell lumber that has dried in a kiln over several weeks or months. Once the lumber has reached 6-15% moisture content, it is ready to be sold and worked into a project. Lumberyards sell lumber by the board-foot, a measurement of volume, not per board, as in a home center. Lumberyards are often the only source of specialty plywood, such as baltic birch or veneered plywood for casework.

I grade lumberyards in three categories: convenience, price and quality. As a professional woodworker, I lean towards convenience. As a teacher, I often will take the best price. As a artist/hobbyist, I often prize quality. Your miles will vary. There are no perfect lumberyards in the DMV. Some have great service and weekend hours, some have incredible selection, some have great prices. None have all three.

Most lumberyards are open 9-5 M-F. Some have Saturday hours, often early. Very, very few have Sunday hours.

Building Material Suppliers sell all the things you need to build a house: pine lumber, LVL beams, concrete, forms, windows, trim, paint, etc. Some carry hardwood lumber, usually in S2S (planed on two sides) and sold by the linear foot. Building supply companies are often a great source for 2x pine (at higher quality than found in a big box store) and western/eastern red cedar.

Building material suppliers usually require a commercial account and have “banker’s hours” – meaning they open early and close early.

Lumber Mills turn logs into lumber. These places often sell slabs, cookies, crotches, and burls for use in furniture. Some mills may specialize in a type of wood, such as local domestic species or a product, such as mantles. The DMV has a number of companies that specialize in live-edge work.

Home Centers, such as Home Depot, Lowe’s, Ace Hardware, Walmart, etc. all may sell lumber of various types. Most lumber in a home center is sold by the piece, so for example, a kiln dried 2×4 will cost $6.25. Home centers are a great source for 2x pine, MDF, melamine and other common sheet goods.

Specialty Stores, such as Rockler, Woodcraft or Micheal’s, sell specialized selections of wood and supplies. These stores are great for specialized needs, rather than a general source of materials.

Let’s break down the local choices:

Lumberyards:

Virginia:

Colonial Hardwoods:

7953 Cameron Brown Ct, Springfield, VA 22153(703) 451-9217

Homepage

Great selection, more expensive prices, in Springfield near the Mixing Bowl, meaning traffic will be inconvenient. Great phone service. Great people in person.

They have rough lumber, pine of all kinds, and slabs.

C.P. Johnson:

21457 Business Ct, Elkwood, VA 22718

(540) 825-1006

Home

The man, the myth, the legend.

A lumberyard specifically designed for the woodworking enthusiast in mind. Cheap prices, incredible selection, great service and….WAY OUT IN CULPEPPER.

The only place for Baltic Birch in non-European sizes, or as I like to call it: the size of freedom.

Dunlap Woodcrafts:

14600 Flint Lee Rd # F, Chantilly, VA 20151

+17036315147

Home

Lumberyard specializing in figured woods for gunstocks and turnings. While they carry some 5/4 and 8/4 material and woods for purchase, the lumberyard to makers and woodworkers doesn’t seem to be their main business, which is gunstocks and custom furniture.

They do have lumber, but on the several occasions I called didn’t have maple or cherry in stock and that gets you off my personal best list.

I call for stock prices and availability before traveling there.

Maryland:

Frederick Lumber Company, Fredrick, MD

https://www.fredericklumber.com/

Exotic Lumber, Annapolis, MD

Home

Lumber Mills:

Local Woods:

49 Catoctin Cir SE, Leesburg, VA 20175

+1 571 442 8361

http://www.localwoodva.com/

Local Woods is a great lumberyard for yuppies who live in Loudoun Co and want urban harvested slabs. Best selection of figured slabs in the area, every time I go shopping.

Mostly walnut, cherry, oak.

Lots of ambrosia maple.

They carry a small stock of maple, oak, cherry, walnut hardwood lumber. They may also have flooring, wall treatments and mantles made from local trees, but really, it’s not what makes Local Wood great: they are slabs.

Herbine Hardwoods (Lucketts in LoCo), Eco-Lumber (Carpathian):

Small-time millers specializing in slabs.

Alexander Bros, Timberville VA

https://www.alexanderbrothers.com/

Mostly slabs and local domestic hardwoods in the rough.  Cheap mantles in 12/4 and 16/4.  Owned by a 4-set of brothers, this company consists of wood/lumber, furniture commissions, leatherworking and architectural blacksmithing.  Great people.  Prices may be the best in the area, quality a notch below CPJ and the breadth of material is on par with the smaller mills.

West Virginia:

Shenandoah Planing Mill, Charles Town, WV

https://www.shenandoahplaningmill.com/

Huuuuuge operation.  Mostly S2s locally milled hardwoods.  Lots of slabs, including walnut.  I was really impressed by the quality and really wonderful hard to find local domestics (beams of QS sycamore anyone?).  They also hold large events in the space.

Building Material Suppliers

Tart Lumber:

22183 Shaw Rd, Sterling, VA 20166

(703) 450-5880

https://www.tartlumber.com/

Sheets Quality Building Materials

703-938-9110

430 Mill Street, N.E.

Vienna, VA 22180

730-430-0116

Shaw Road

Sterling, VA 22170

http://www.sheets.cardservicetotalweb.com/

This is a weird mix of new old stock and new building materials. They sell things that have been on their shelves since the 1980’s but also have lots of new materials as well. All at top dollar. But if it hard to find somewhere else, Dave Sheets will likely be able to find it for you. If it is a stock item, he often delivers same day. Not the most friendly place; however, don’t get intimidated. the place out in Sterling also sells some structural steel. — review by Bill A, local maker and former general contractor.

Home Centers

Lowes:

White melamine, maple/birch/oak plywood for shop/painted-finish projects. If you want to buy pine, stick to the untreated 2x8s, 2x12s, etc.

Ignore the 2x4s and use the 2x6s against my better advice and at your peril. Lots of videos out there on how to “get great lumber at the home center.”

Home Depot:

Same selection as Lowe’s, except they have a much, much nicer sanded plywood that is really spectacular and only $30 (pre-pandemic price) a sheet or so.

Just crushes the value/quality curve in my mind.

The Reston Home Depot is the “Bad Place” for a reason. Do not attempt this store early hours, evenings between 4 and 7. Or really, any time you need great organization, accessible store clerks, or decent selection.

Ashburn/Sterling/Fairfax/Merrifield locations are all measurably better run.

Specialty:

Woodcraft:

Springfield, Virginia

or

Leesburg, Virginia

or

Rockville, Maryland

Home

https://www.woodcraft.com/stores/washington-dc-area

Rockler:

12975 Fair Lakes Shopping Center Ste 2975

Fairfax, VA 22033

Store Phone:

(571) 435-8030

https://www.rockler.com/retail/stores/va-fairfax-store Honestly, only good for very exotic turning materials and maybe as a purveyor of General Finishes and other premium finishes and tooling. As a lumberyard these stores are meh at best for selection and quite expensive. All these stores are open later than other lumberyards and even on Sundays.

I rarely see as good a selection in lumberyards for turning blanks and wild exotics. But Ebay also sells turning blanks and for less.

As does Amazon and elsewhere.

Amazon/Ebay/Web:

Best place for turnings and weird stuff.

There are a lot of lumberyards that will allow you to mail-order lumber and plywood, such as https://www.woodworkerssource.com/.

Not sure about the quality, I have only bought small stock from these sources.

If you have a review of a local lumberyard, let me know! I will update this page as I visit and check out different resources in the DMV area.

Techniques and Tips for Working in Cardboard

This spring of ‘24 I TA’d an Art & Design class at the Fab Lab of a local community college. The students had to design mid-size sculptures from cardboard and paper tape. I developed a list of some tips, tricks and techniques I learned while watching the class in the studio, assisting and trouble-shooting, testing out various construction techniques and tools.

Planning Your Project

Before you start cutting cardboard, sketch out your sculpture design. Consider the overall shape, dimensions, and any details you want to include. Sketch your project from a variety of viewpoints – a front view, side view, a top view – just like a technical drawing in engineering. If you sketch your early drafts small, create full-size or nearly full size sketches.

Most students find planning difficult, but just because something is difficult doesn’t mean it should be avoided.

If you are a computer person, create a CAD model in a preferred software.  Programs like Adobe Illustrator or Inkscape can generate these plans in 2D space, whereas 3D CAD programs, such as On-shape, Fusion 360, Inventor, Blender, etc. can create 3D models.  I generated the sketches above utilizing Fusion 360.  Building a Möbius sculpture is no small feat – but the visual sketch really helps me visualize the problem and might provide some clues to its construction. Pepakura is the Japanese art of papercraft and there are several computer programs built to take 3D models and turn them into paper patterns.

Lastly, create a small to medium sized model. Again, be as neat as possible. No shortcuts. Make your construction as perfect as possible, using as many construction techniques as possible for the final project.

Materials:

Not all cardboard is created equal.  Choosing the right cardboard for each step can truly be the difference between a successful project and a project full of frustration.

Cardboard has a number of advantages as a prototyping/construction material.  Cardboard is cheap, robust and easy to work with.  Brand-new cardboard can be purchased locally, online or even sourced for free.  Used cardboard can be found at nearly any grocery or large store. For free.  Cardboard can be manipulated with common crafting and woodworking equipment.  Cardboard can be glued with common adhesives and can be painted, shellacked and lacquered.

Cardboard has a few main characteristics: number of layers (or plys or walls), flute type,  surface treatment, and grain direction.

Walls/Faces/Ply – Cardboard comes in many thicknesses, but for most prototyping/art projects, one ply (or single wall) cardboard is the best choice.  Double and triple-walled cardboard are more appropriate for very large structures or structures which need to hold weight.

Surface treatment –  Some cardboard, especially work used in packaging foodstuffs and products, may have a surface coating that will feel slick and glossy.  This type of coating will reject paint, glues and other surface treatments.  New, bare cardboard that feels slightly rough will accept all paints/lacquers/shellacs/glues without complaint.  I almost always use new cardboard.

Grain – In the graphic above, notice the fluting in between the paper walls of cardboard.  The direction those flutes flow in is called the cardboard’s grain.  Cardboard can bend and fold in one orientation better than it can in a different orientation.  The grain causes this difference.  Test out your cardboard construction techniques with different grain orientations before committing to cutting your parts out.

Sourcing cardboard can be tricky on a budget.  The smaller the budget, the more compromises we make in construction.  Recycled cardboard can be found at many retailers for the price of a question to the right person.  The quality can be all over the place: grease, coatings, and unnecessary folds and tears all cause construction issues.  Costco has large sheets of cardboard that is single wall, raw/bare paper coatings and relatively intact that it uses between pallets to protect goods.

New cardboard can be purchased from a variety of sources.  I look for industrial supply companies, such as Global Industrial or Uline that specialize in packaging.  Amazon sells at a decent price point from a variety of sellers.  Home Depot, Lowe’s, and other big box hardware stores often have moving boxes for a few bucks.   Lastly, USPS sends flat rate postal boxes to your home for free.

Tools

Sharp utility knives, scissors, and a cutting mat are essential tools for working with cardboard. Make sure your blades are sharp to achieve clean cuts without tearing the cardboard.

Here are a selection of cardboard specific tools (and their use cases)

Hand Tools:

Utility Knife – I prefer a knife with a comfortable handle and retractable blade.  Blades can be bought by the bucket load for very little, so I often have a cheap pack of blades at the ready.

Hobby Knife – a smaller, lighter knife with a very sharp but flexible blade.  Useful for small, fiddly work, the hobby knife is usually a poor choice in cardboard.

Electric Scissors – small, powered scissors come in a variety of formats.  Most useful for long straight cuts when either the number of cuts or hand strength of the artist would limit use of a heavy duty scissor.

Heavy duty scissors – Often labeled as heavy duty scissors, kitchen shears or industrial scissors, these scissors often have shorter, angled cutting shears for better leverage cutting through heavier materials such as chicken bone, leathers and of course cardboard.

Canary Cardboard Cutter – A serrated saw that works on the push or pull stroke and can punch through a sheet of cardboard.  This little saw is great for breaking down thicker pieces of cardboard and cutting smooth curves.

Guillotine Paper Shear – These platforms are great creating long, repeatable cuts, such as squares or rectangles.  A heavy duty paper shear and thin cardboard works best for these tools.  I have a vintage Swingline and while I don’t often pull it out of deep storage, when I do, I’m a happy cardboard cowboy.

Makerspace & Digital Tools:

Vector Graphics Software – Cardboard is a flat, nearly 2D material.  Vector graphic software can help you design and create complex shapes by unfolding the shape into a geometric net.  Vector graphic software also allows you to use some very advanced tools, namely the laser cutter to create your project.

PaperMaker Or Pepakura Designer – These two programs take an .STL file and unfolds the geometry to create a geometric net which can be printed or lasered out, then refold your object back into shape.  The software is free, which means it mostly works, but has tons of quirks.  It needs a vector graphic software to unlock its full potential.

TinkerCAD – This beginner CAD (computer aided design) software allows you to create complex projects from simple shapes and concepts.  TinkerCAD has many more capabilities, but the design space is uniquely appropriate for cardboard construction.

Computer Aided Design Software – Computer Aided Design software, such as On-shape, Fusion 360 or Autodesk Inventor, can be used to create complex shapes, projects and more.  With cardboard construction, the sheet metal features in On-shape and Fusion 360 all the user to create flat, 2D nets which can be bent and cut into 3D shapes.  A great way to see how a piece might come together.  You can also take a shape, slice it into sections and build up a sculpture, similar to a 3D printer.

Laser Cutter – A laser cutter is a tool which utilizes a laser to cut, score or engrave a substrate.  The laser cuts faster and more accurately than by hand, so it’s useful for large, complex projects or sculptures.

Brake, Shears and Rollers – These are metalworking tools which can easily work plastics and cardboard.  Excellent ways to cut, bend and roll flat stock into curves.  While not essential to good work, access to a tool like this can make many tasks much easier.

Safety: Take your time when cutting cardboard to ensure accuracy. Use a ruler or straight edge as a guide for straight cuts, and use controlled motions to prevent tearing.  Sharp blades save fingers.  Cut/puncture gloves get better in feel and function all the time.  A great pair of these gloves pay for themselves after only one bad mishap.

Construction Techniques

There are many ways to manipulate cardboard to create interesting textures and shapes. Try scoring the cardboard with a knife to create folds, or layering pieces to add depth and dimension to your sculpture.  A quick Google search for “cardboard construction techniques” can open lots of possibilities.   Our version of the display looks like this

Glue and Tape: Use hot glue, white glue, construction adhesive, spray glue and wood glue are all great glues for cardboard.  Hot glue creates quick connections but struggles over the long term.  The white glue et. al. all need time to set and cure.  In order to use these glues to their full extent, you need to clamp the cardboard together and hold it clamped until the glue is dry, approximately 10 to 15 hrs later. Tape makes a great clamp.  If you use hot glue to tack two pieces of cardboard together while having a little bit of white glue in the joint, you combine the strength of white glue, etc, with the convenience and speed of hot glue.  Contact cement, superglue, epoxy and water-activated glues may work in certain contexts, but usually the glue needs a non-porous substrate (such as plastic or metal in the case of super glue, contact cement, epoxy) and or the activator (polyurethane aka Gorilla Glue) will delaminate the cardboard.  Experiment with different adhesives to find what works best for your project.

Tape can also be used to create interesting surfaces and hold the structure together.  Painters, packing and masking tapes all stick to cardboard easily, but don’t take well to surface treatments like paint or lacquer.

Paper tape, the kind of packing tape with a paper backing instead of plastic, comes in two adhesive types – a water activated and a regular adhesive.  Water activated tapes are best because they allow you to adjust their position after attachment without ripping or tearing the cardboard.

Paint and Finishes

Once your project is complete, you can paint it to add color and texture. Consider using acrylic paint, spray paint, or even decoupage techniques to achieve the desired look.

Color and gloss are very important in sculpture and making.  High gloss creates a shiny finish, which can be fascinating for the audience.  High gloss also protects the work from the elements.  High gloss finishes also showcase any flaws on the surface and have very low repairability.  Matte paints, on the other hand, hide flaws at the expense of protection.

Light colors can expose poor craftsmanship – think of a faded stain on a white shirt.  On the other hand, darker colors hide flaws in craftsmanship.

Cardboard can be finished similarly to wood, so check out this link to learn about the different finishes and what they do.  To go from a good to great project, some things to consider:

Water-based paints can cause ripples and waves in paper/cardboard structures.  To combat this, use light coats to build up the paint and minimize the amount of water the cardboard has to absorb.   Shellac-based primers may give better results.

Use a roller instead of a brush to limit ripples and runs on large, flat surfaces.  I use a 4” foam roller for large surfaces and a 1” sash brush for details.   A sash brush is a paint brush with angled bristles.  The shape allows it to get into corners and tight spaces.

Use a brush designed for the type of paint you are using.  Good brushes cost only a few dollars more than cheap brushes, but the final result is the difference between good and great.  Small, higher quality brushes are often sold as artist brushes.

Spray paint, especially if the spray paint is cheap and/or glossy, will require multiple light coats – the coverage is surprisingly terrible.  Use a matte primer before trying a glossy finish.  Not all spray paints are built the same.  Krylon and Rustoleum make entry level spray paints.  My experience with Behr’s Premium line has been eye-opening.   Premium spray paint covers better and provides a more even finish and spray pattern.  Premium brands, such as Montana, MTN and Molotow provide an even better finish.

Bedframe Bench in Sycamore, Ipe and Cherry

This past December I completed this bench for a close friend. He has served as a mentor and cheerleader for my professional education, woodworking and cooking endeavors for the last five years, so when he asked me to build him a special piece from his grandmother’s solid cherry bed frame, I couldn’t say no. I utilized several new techniques and processes to complete this unique piece.

The bench’s seat was milled from a single slab of local air-dried sycamore. I was able to secure most of the trunk, but this seat came from the exact center of the trunk. I cut out the pith of the tree, creating two rift sawn sycamore planks. While I did lose the single-slabby-chic look I love, rift sawn sycamore moves very little, and the two planks match in color.

I used dominoes with polyurethane glue to get everything together. Weather-resistant polyurethane glue is perfect for outdoor applications like this. The raw slab wasn’t dried to perfect condition. The raw slab had water damage and some light spalting. Luckily, the milling process kept the spalting while removing the worst of the water damage.

The bench frame needed some wily construction and problems-solving. First, I needed to cut a straight line across the footboard, parallel to the plane of the feet. Each post contained squared sections with small roundovers and a number of turned feet and finials. I decided to make a plywood sled and utilize scrap wood to clamp the unwieldy frame down. A quick prayer, then cut, then flip and repeat later, and I had a front frame with a straight edge ready for a bench seat. The rails of the bench frame are made of scrap ipe. Strong, heavy, rot-resistant woods such as ipe work well in outdoor applications such as this. I utilized a doweling jointer to get the pieces together. Dowel joints provide a lot of strength but do require more accuracy in construction than domino or biscuit joints. In this application, biscuits wouldn’t have provided the necessary strength for a bench, while dominos would have been limited in number (and strength) while being difficult to install. My doweling jointer was just large enough with just a large enough fence to create a strong joint with very little fuss.

Once the bench frame was glued up, I needed to create the small cutouts that allow the seamless for the frame. I used a radius gauge to measure the round overs and created a template for the cut out on my laser cutter from acrylic. After cutting the bulk out with a jigsaw, I used a top bearing flush trim bit mounted in a hand router to define the curve, then used a bottom bearing flush trim bit mounted in a router table to clean the curve up. The fit was perfect.

Outdoor wood projects will move, split and rot if left to the elements. Some woods, such as the ipe used in this project, last longer in the elements, but all woods eventually rot and crack without protection. To protect this project, I sprayed the bedframe with 2 coats of exterior/interior primer and 3 coats of outdoor water-based acrylic enamel. I love spray finishes. High-gloss finishes, such as lacquers, polyurethanes and gloss paints, really respond to spray finishing. So smooth, so clean, so perfect. To protect and showcase the sycamore bench top, I utilized a matte/high-gloss clear polyurethane. I cut the water-based matte polyurethane with 10% water and sprayed several coats to build the finish up. I sanded the top with 300(ish) grit sandpaper, wiped off the dust, then applied two gloss coats. I brushed the last coats on but still looked amazing. High quality finishes really perform under less than ideal conditions. In this case, spray season ends sometime in October here in Northern Virginia, so I had to brush on my last coats. To protect the feet from wicking moisture from the end-grain, I installed adjustable metal feet and coated the bedframe’s foot bottoms in epoxy.

Assembly went smooth – figure eight fasteners make quick work of attaching bench or table tops while accounting for wood movement. As a final touch, I designed a special plaque congratulating my friend on his recent wedding and attached it to the back of the bench. I laser engraved the image using a dry moly lube coating on stainless steel. The lube heats up and turns into a permanent coating. I sprayed several coats of exterior spray lacquer to minimize rust.

This piece represents so much to me. I haven’t showcased my work in nearly 3 years here on WoodshopCowboy, not because I haven’t been making awesome projects, but because I my energy and heart has been tied up by a pandemic, trying to launch a woodworking business and nearly 3 years as a program director for a local makerspace developing workforce development and youth programs. Delivering this piece wasn’t just delivering on a long ago promise to a friend, but also the recovery of a long ago promise to myself, a promise to make beautiful things and to enjoy the journey.

Thank you for your continued support.

Thank you for visiting my blog. To support for this site, please like WoodshopCowboy on Facebook or follow me on Instructables. Twitter, Pinterest or Instagram.

#Woodworking Classes Have Gone Online

Even when the makerspace is closed, makers gonna make. I have moved my woodworking instruction online during this challenging time, hoping to inspire and excite you.

My Project Class series online and moved it to Wednesday nights. On April 22nd, I walked through the design and construction of a simple kitchen cabinet. In this class, students learned to source and prep plywood the easy way, use all the necessary tools, joinery techniques, door construction and finishing to create your own kitchen cabinet at home or at a local makerspace.

Image from iOS (3)

On May 6th,I will build a simple box with a raised panel lid. This box will feature miter and spline joints, raised panels and bullet hinges.

Image from iOS

On May 22nd, I will demonstrate making brindle & half-lap joints, dadoes and more on the table saw for a workbench.

These are great opportunities to talk shop with an experienced woodworker with a low student count. I always have fun and rarely offer classes twice – I like designing classes as much as I like building projects. So come join me at Nova Lab’s MeetUp.

Learn #Woodworking this weekend! Two Spots Left!

Wooworking Live-Edge Slap TablesWhat are you making this weekend? Here at Woodshop Cowboy, we are making cutting boards and slab tables at Nova Labs, of Reston, Virginia. Nova Labs is offering two premier woodworking classes at the premier makerspace in the DMV area. If you have ever wanted to learn woodworking from tree-to-furniture, this is the time to do it!

learn-woodworking

WW: Live-Edge Slab Tables

Farm to table? We are gonna do tree-to-table! Learn to turn a massive slab of wood into a functional piece of furniture! In this class we will learn all about SLABS! Featuring a field trip to a local supplier, Local Wood of Leesburg/Berryville VA, students will learn all about how slabs are milled, dried and made ready for market. Students will purchase slabs, then flatten and prep their slab for finishing. Students can design and build wood bases during class time, or purchase pre-made legs. Consider this a build-a-long: you get access to the tools, expertise and guidance of an experienced woodworking instructor. Make butterfly keys, discuss epoxy pours, discuss (and if it’s a nice day, actually spray) spray and oil-based finishes. This is the PREMIER WOODWORKING class of the summer 2018.

16688040294_1b9aec68f3_b
Solid Wood Slab Dining Tableby Indo Gemstone IndoGemstone
Licensed under CC-BY 2.0
Original source via Flickr


Be the hipster you know you can be!

Sign up at Meet Up to attend this great class! Plus, you can attend the Day 1 Session for only $15!

April 18, 6pm @ Leesburg Local Wood VA

April 19, 7pm to 10pm

April 20, 9am to 4pm

That’s over TEN HOURS of small group instruction. LET’S DO THIS!

Cost: $200. Materials must be purchased by student separately on first day of class.

This Week in the Shop: The Closet Organizer

The Closet Organizer

Last month, Marie Kondo’s show hit Netflix and it seemed like everyone needed to find a way to tidy up their life. I renovated the laundry last year – removing and installing new flooring, re-painting the walls, constructing new cabinets, etc. The last ticket to punch was to design and install a closet organizer.

The Closet Organizer

I began by figuring out what I would store in the closet, then designing a shelving system that would work in the space available. Taking a look at what I needed looked like this:Closet Organizer

Essentially, I designed a small tower with two shelves and two pull out drawers. Due to the design of the closet, I would install the tower underneath a top shelf, slightly off center. This allowed me to pull out the drawers fully with my chosen slides.

This build used pocket holes for most joinery, full extension slides, and liberal use of a table saw. Check out the video to follow along with the build!

This slideshow requires JavaScript.

This Week in the Classroom: Top Ten Middle School #MakerEd Challenges (Plus Two!)

Top Ten Middle School #MakerEd Challenges (Plus Two!).jpgThis Week in the Classroom I’m going to explore a variety of design challenges that I use in my classroom. I designed each of these projects to prompt students to explore the engineering design process, learn basic scientific concepts, such as forces and loads on structures, learn executive functioning and soft skills, and develop presentation skills in a variety of media. These projects are designed to be super flexible in practice. I can extend these projects, compress the time, develop thematic elements. None of these projects use expensive materials or electronics. Some of these project briefs I use nearly every year, in nearly every course. They are simply that good.

Continue reading “This Week in the Classroom: Top Ten Middle School #MakerEd Challenges (Plus Two!)”

This Week in the Shop: The Library Book Nook

The Library Book NookThis Week in the Shop, I build a library book nook for my school. My school librarian came to me with her coffee bar theme for a renovated library and she wanted a circular book nook to take advantage of a certain space in the library. This book nook had to incorporate a column and reclaimed table top, be made under budget (roughly $500), have a professional look, design and materials.

I looked at her requirements, looked at the space and said…yeah….I can do that.

Follow along as I show you how!

Installing a Laminate Countertop

My toughest challenge was resurfacing an old table top. This table top needed a new, hard surface that wear well and last years and years. Laminate, a composite plastic material with a cloth backing, fits the bill nicely and can be ordered in a variety of colors and shapes from your local home center.

Laminate comes in special order sheets, often 24” or 30” wide, and 96” long – the perfect size for a kitchen countertop. I had a table, so I needed to buy a 48” x 60” sheet. The trick is to very carefully measure your countertop and edging, then develop a cut list, then buy the right material for your work. The half-circle shape of the table top meant we had to purchase an extra sheet in a funky width.

Untitled_1.37.1

Laminate cuts very easy with a sharp table saw blade but getting to the blade safetly on a table saw may be tricky. it may be safer to lay the laminate out on a sheet of sacrificial plywood and cut it with a sharp, high-tooth circular saw blade, good face up. I used a featherboard to help keep the laminate straight and flat on the table.

Untitled_1.40.1

Prep the substrate for application with a quick cleaning and light sanding. Next, spread contact cement with a roller on both the laminate and substrate. Allow the contact cement to dry, roughly 20 minutes, depending on environmental conditions. Wear a respirator or have great ventilation during this step.Untitled_1.41.1

Carefully place dowels or small sticks on the surface of the substrate. Place the laminate in position on the dowels. Untitled_1.42.1
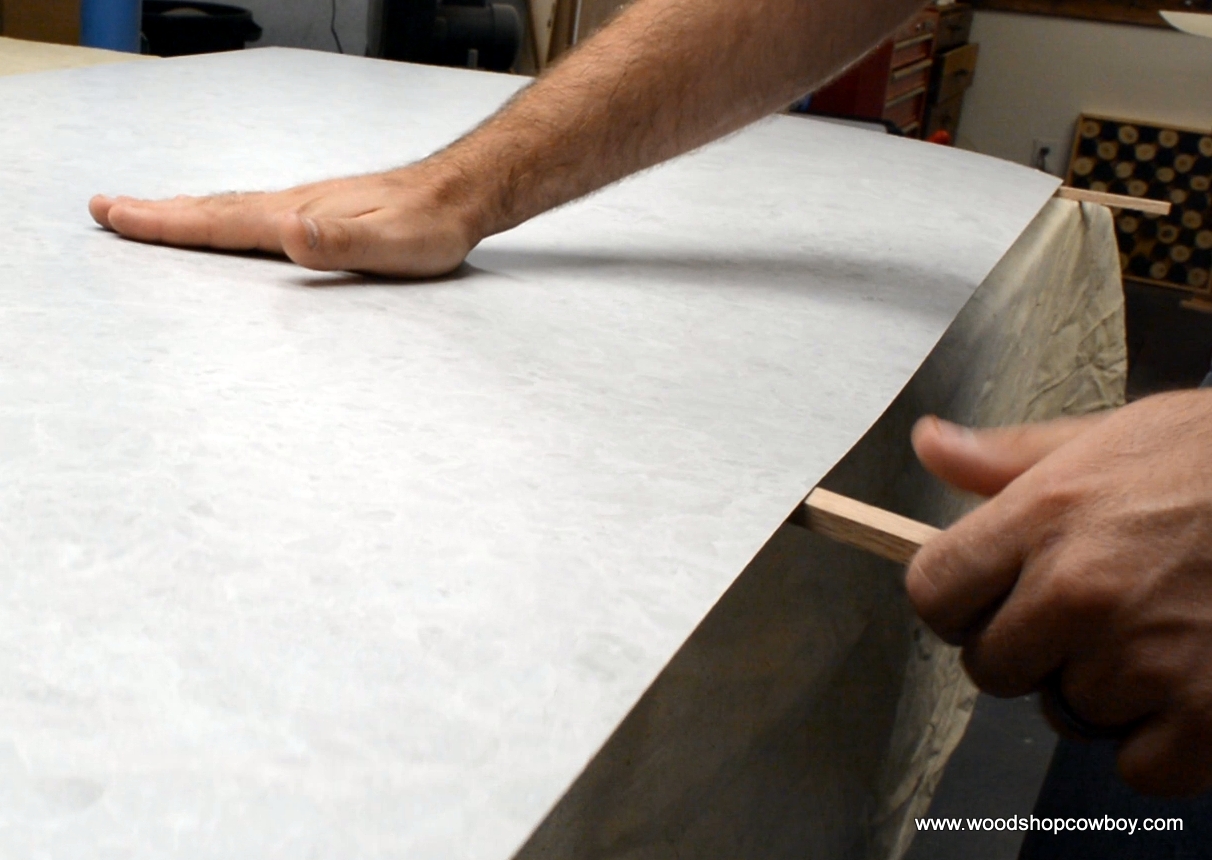
Carefully remove the dowels, starting in the center. Contact cement bonds instantly, so move slow and careful. Untitled_1.43.1Then use a J-roller to push out any air bubbles and help fix the countertop in place.

Untitled_1.45.1Using a small trim router with a flush-cutting bit, trim the edges of the laminate flush with the substrate surface. I did the edges first, then the faces of my tabletop.

Lastly, use sandpaper or a file to clean the edges and remove burrs and sharp corners.

With any luck, this design will last a few student generations. The wood columns are strong and sturdy, and if the table top sags or shifts, larger brackets can always be installed.

Thank you for your continued support.

Thank you for visiting my blog. To support for this site, please like WoodshopCowboy on Facebook or follow me on Instructables. Twitter, Pinterest or Instagram.

Learn to Make Slab Tables & Cutting Boards

Learn WoodworkingWhat are you making this summer? Here at Woodshop Cowboy, we are making cutting boards and slab tables at Nova Labs, of Reston, Virginia. Nova Labs is offering two premier woodworking classes at the premier makerspace in the DMV area. If you have ever wanted to learn woodworking from tree-to-furniture, this is the time to do it!

WW: Cutting Boards

2-Day class: 7 shop hours. Friday 7pm to 10pm and Sun 10 am to 2 pm

learn-woodworking

Have you ever wanted to learn woodworking, but didn’t know where to start? In this course, build a beautiful wood cutting board while learning the ins-and-outs of the major woodworking machines in the woodshop. We learn the basics about makerspaces, hardwood vs. softwood, shop safety, milling dimensioning and more. This is a popular class, offered quarterly…in fact, it might already be full!

Learn to use the SawStop Table Saw, Jointer, Planer, Miter Saw, Band Saw, Disk/Belt Sander, Oscillating Sander, Drill Press, Small Band Saw, Scroll Saw — every tool except the lathe and the kitchen sink!

Cost: $100

WW: Live-Edge Slab Tables

Farm to table? We are gonna do tree-to-table! Learn to turn a massive slab of wood into a functional piece of furniture! In this class we will learn all about SLABS! Featuring a field trip to a local supplier, Local Wood of Leesburng/Berryville VA, students will learn all about how slabs are milled, dried and made ready for market. Students will purchase slabs, then flatten and prep their slab for finishing. Students can design and build wood bases during class time, or purchase pre-made legs. Consider this a build-a-long: you get access to the tools, expertise and guidance of an experienced woodworking instructor. Make butterfly keys, discuss epoxy pours, discuss (and if it’s a nice day, actually spray) spray and oil-based finishes. This is the PREMIER WOODWORKING class of the summer 2018.

16688040294_1b9aec68f3_b
Solid Wood Slab Dining Tableby Indo Gemstone IndoGemstone
Licensed under CC-BY 2.0
Original source via Flickr


Be the hipster you know you can be!

Sign up at Meet Up to attend this great class! Plus, you can attend the Day 1 Session for only $10!

July 26, 6pm @ Leesburg Local Wood VA

July 27, 7pm to 10pm

July 28, 9am to 4pm

That’s over TEN HOURS of small group instruction. LET’S DO THIS!

Cost: $150. Materials must be purchased by student separately on first day of class.