
This spring of ‘24 I TA’d an Art & Design class at the Fab Lab of a local community college. The students had to design mid-size sculptures from cardboard and paper tape. I developed a list of some tips, tricks and techniques I learned while watching the class in the studio, assisting and trouble-shooting, testing out various construction techniques and tools.
Planning Your Project
Before you start cutting cardboard, sketch out your sculpture design. Consider the overall shape, dimensions, and any details you want to include. Sketch your project from a variety of viewpoints – a front view, side view, a top view – just like a technical drawing in engineering. If you sketch your early drafts small, create full-size or nearly full size sketches.

Most students find planning difficult, but just because something is difficult doesn’t mean it should be avoided.
If you are a computer person, create a CAD model in a preferred software. Programs like Adobe Illustrator or Inkscape can generate these plans in 2D space, whereas 3D CAD programs, such as On-shape, Fusion 360, Inventor, Blender, etc. can create 3D models. I generated the sketches above utilizing Fusion 360. Building a Möbius sculpture is no small feat – but the visual sketch really helps me visualize the problem and might provide some clues to its construction. Pepakura is the Japanese art of papercraft and there are several computer programs built to take 3D models and turn them into paper patterns.
Lastly, create a small to medium sized model. Again, be as neat as possible. No shortcuts. Make your construction as perfect as possible, using as many construction techniques as possible for the final project.
Materials:
Not all cardboard is created equal. Choosing the right cardboard for each step can truly be the difference between a successful project and a project full of frustration.
Cardboard has a number of advantages as a prototyping/construction material. Cardboard is cheap, robust and easy to work with. Brand-new cardboard can be purchased locally, online or even sourced for free. Used cardboard can be found at nearly any grocery or large store. For free. Cardboard can be manipulated with common crafting and woodworking equipment. Cardboard can be glued with common adhesives and can be painted, shellacked and lacquered.
Cardboard has a few main characteristics: number of layers (or plys or walls), flute type, surface treatment, and grain direction.
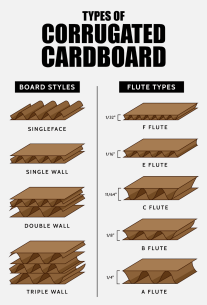
Walls/Faces/Ply – Cardboard comes in many thicknesses, but for most prototyping/art projects, one ply (or single wall) cardboard is the best choice. Double and triple-walled cardboard are more appropriate for very large structures or structures which need to hold weight.
Surface treatment – Some cardboard, especially work used in packaging foodstuffs and products, may have a surface coating that will feel slick and glossy. This type of coating will reject paint, glues and other surface treatments. New, bare cardboard that feels slightly rough will accept all paints/lacquers/shellacs/glues without complaint. I almost always use new cardboard.
Grain – In the graphic above, notice the fluting in between the paper walls of cardboard. The direction those flutes flow in is called the cardboard’s grain. Cardboard can bend and fold in one orientation better than it can in a different orientation. The grain causes this difference. Test out your cardboard construction techniques with different grain orientations before committing to cutting your parts out.
Sourcing cardboard can be tricky on a budget. The smaller the budget, the more compromises we make in construction. Recycled cardboard can be found at many retailers for the price of a question to the right person. The quality can be all over the place: grease, coatings, and unnecessary folds and tears all cause construction issues. Costco has large sheets of cardboard that is single wall, raw/bare paper coatings and relatively intact that it uses between pallets to protect goods.
New cardboard can be purchased from a variety of sources. I look for industrial supply companies, such as Global Industrial or Uline that specialize in packaging. Amazon sells at a decent price point from a variety of sellers. Home Depot, Lowe’s, and other big box hardware stores often have moving boxes for a few bucks. Lastly, USPS sends flat rate postal boxes to your home for free.
Tools
Sharp utility knives, scissors, and a cutting mat are essential tools for working with cardboard. Make sure your blades are sharp to achieve clean cuts without tearing the cardboard.
Here are a selection of cardboard specific tools (and their use cases)
Hand Tools:
Utility Knife – I prefer a knife with a comfortable handle and retractable blade. Blades can be bought by the bucket load for very little, so I often have a cheap pack of blades at the ready.
Hobby Knife – a smaller, lighter knife with a very sharp but flexible blade. Useful for small, fiddly work, the hobby knife is usually a poor choice in cardboard.
Electric Scissors – small, powered scissors come in a variety of formats. Most useful for long straight cuts when either the number of cuts or hand strength of the artist would limit use of a heavy duty scissor.
Heavy duty scissors – Often labeled as heavy duty scissors, kitchen shears or industrial scissors, these scissors often have shorter, angled cutting shears for better leverage cutting through heavier materials such as chicken bone, leathers and of course cardboard.
Canary Cardboard Cutter – A serrated saw that works on the push or pull stroke and can punch through a sheet of cardboard. This little saw is great for breaking down thicker pieces of cardboard and cutting smooth curves.
Guillotine Paper Shear – These platforms are great creating long, repeatable cuts, such as squares or rectangles. A heavy duty paper shear and thin cardboard works best for these tools. I have a vintage Swingline and while I don’t often pull it out of deep storage, when I do, I’m a happy cardboard cowboy.
Makerspace & Digital Tools:
Vector Graphics Software – Cardboard is a flat, nearly 2D material. Vector graphic software can help you design and create complex shapes by unfolding the shape into a geometric net. Vector graphic software also allows you to use some very advanced tools, namely the laser cutter to create your project.
PaperMaker Or Pepakura Designer – These two programs take an .STL file and unfolds the geometry to create a geometric net which can be printed or lasered out, then refold your object back into shape. The software is free, which means it mostly works, but has tons of quirks. It needs a vector graphic software to unlock its full potential.
TinkerCAD – This beginner CAD (computer aided design) software allows you to create complex projects from simple shapes and concepts. TinkerCAD has many more capabilities, but the design space is uniquely appropriate for cardboard construction.
Computer Aided Design Software – Computer Aided Design software, such as On-shape, Fusion 360 or Autodesk Inventor, can be used to create complex shapes, projects and more. With cardboard construction, the sheet metal features in On-shape and Fusion 360 all the user to create flat, 2D nets which can be bent and cut into 3D shapes. A great way to see how a piece might come together. You can also take a shape, slice it into sections and build up a sculpture, similar to a 3D printer.
Laser Cutter – A laser cutter is a tool which utilizes a laser to cut, score or engrave a substrate. The laser cuts faster and more accurately than by hand, so it’s useful for large, complex projects or sculptures.
Brake, Shears and Rollers – These are metalworking tools which can easily work plastics and cardboard. Excellent ways to cut, bend and roll flat stock into curves. While not essential to good work, access to a tool like this can make many tasks much easier.
Safety: Take your time when cutting cardboard to ensure accuracy. Use a ruler or straight edge as a guide for straight cuts, and use controlled motions to prevent tearing. Sharp blades save fingers. Cut/puncture gloves get better in feel and function all the time. A great pair of these gloves pay for themselves after only one bad mishap.
Construction Techniques
There are many ways to manipulate cardboard to create interesting textures and shapes. Try scoring the cardboard with a knife to create folds, or layering pieces to add depth and dimension to your sculpture. A quick Google search for “cardboard construction techniques” can open lots of possibilities. Our version of the display looks like this

Glue and Tape: Use hot glue, white glue, construction adhesive, spray glue and wood glue are all great glues for cardboard. Hot glue creates quick connections but struggles over the long term. The white glue et. al. all need time to set and cure. In order to use these glues to their full extent, you need to clamp the cardboard together and hold it clamped until the glue is dry, approximately 10 to 15 hrs later. Tape makes a great clamp. If you use hot glue to tack two pieces of cardboard together while having a little bit of white glue in the joint, you combine the strength of white glue, etc, with the convenience and speed of hot glue. Contact cement, superglue, epoxy and water-activated glues may work in certain contexts, but usually the glue needs a non-porous substrate (such as plastic or metal in the case of super glue, contact cement, epoxy) and or the activator (polyurethane aka Gorilla Glue) will delaminate the cardboard. Experiment with different adhesives to find what works best for your project.
Tape can also be used to create interesting surfaces and hold the structure together. Painters, packing and masking tapes all stick to cardboard easily, but don’t take well to surface treatments like paint or lacquer.
Paper tape, the kind of packing tape with a paper backing instead of plastic, comes in two adhesive types – a water activated and a regular adhesive. Water activated tapes are best because they allow you to adjust their position after attachment without ripping or tearing the cardboard.
Paint and Finishes
Once your project is complete, you can paint it to add color and texture. Consider using acrylic paint, spray paint, or even decoupage techniques to achieve the desired look.
Color and gloss are very important in sculpture and making. High gloss creates a shiny finish, which can be fascinating for the audience. High gloss also protects the work from the elements. High gloss finishes also showcase any flaws on the surface and have very low repairability. Matte paints, on the other hand, hide flaws at the expense of protection.
Light colors can expose poor craftsmanship – think of a faded stain on a white shirt. On the other hand, darker colors hide flaws in craftsmanship.
Cardboard can be finished similarly to wood, so check out this link to learn about the different finishes and what they do. To go from a good to great project, some things to consider:
Water-based paints can cause ripples and waves in paper/cardboard structures. To combat this, use light coats to build up the paint and minimize the amount of water the cardboard has to absorb. Shellac-based primers may give better results.
Use a roller instead of a brush to limit ripples and runs on large, flat surfaces. I use a 4” foam roller for large surfaces and a 1” sash brush for details. A sash brush is a paint brush with angled bristles. The shape allows it to get into corners and tight spaces.

Use a brush designed for the type of paint you are using. Good brushes cost only a few dollars more than cheap brushes, but the final result is the difference between good and great. Small, higher quality brushes are often sold as artist brushes.
Spray paint, especially if the spray paint is cheap and/or glossy, will require multiple light coats – the coverage is surprisingly terrible. Use a matte primer before trying a glossy finish. Not all spray paints are built the same. Krylon and Rustoleum make entry level spray paints. My experience with Behr’s Premium line has been eye-opening. Premium spray paint covers better and provides a more even finish and spray pattern. Premium brands, such as Montana, MTN and Molotow provide an even better finish.

One thought on “Techniques and Tips for Working in Cardboard”