I’m glad to be back on the blogosphere after so long away.
2016 marks my fifth year blogging at www.woodshopcowboy.com. I am happy to announce some changes in direction:
Boom, Boom, Boom. Essential Question: Can I make a catapult shoot a ping pong ball thirty feet? And use it in zombie self defense?
1) A shift in local focus. From 2008 to 2016 I resided in Houston, TX. This spring, my wife took a new job in Northern VA. This shift has coincided and necessitated a decision to step away (for a year) the in-a-school maker-ed classroom. I will still teach, just to smaller and handsomer audiences (my two sons). Expect articles describing the local Maker and woodworking scenes.
2) A shift in content and frequency. More projects, less curriculum. As an active educator, I found that as my responsibilities in the daily classroom increased, my frequency decreased and my length increased. I’m hoping to reverse this trend. This Week In The Classroom will be retired as a regular feature until future notice. I’ll still blog kid-centered projects, but my audience will be more parental-focused and less teacher-oriented.
3) A shift into advocacy. In the past two years, my professional career as a Maker Education teacher in a special needs school has taken off. This site has been a huge part of my success in that arena. I hope to continue my unique mix of advocacy and play to this blog.
4) A year-end goal. Writing a book.
Making A Maker: Skills & Projects for Kids (and their Parents!) to Master
Many parents ask me “how can I help foster this thing called Making at home?” And while there are plenty of project books and kid books out there, very few books help coach parents to create fun, creative environments for their kids and help them teach simple skills, like sawing a board, to a young person. This book approaches Maker projects in a developmental context, linking individual projects to Maker skills to children’s developmental levels and teaching standards for home-school environments. For parents with young people that are ahead of the curve, you can jump in anywhere and build skills. For parents with kids that need more hands-on stuff and extra developmental time, you can slow down and explore. If you have a kid that loves art, but you want to sneak in science and math…oh, I’ve got that too!
5) Increased social media presence. Expect more updates on Twitter, Facebook, Pinterest and Instagram. Updates on projects, ideas, and stories which catch my eye.
Thank you for your continued support.
Thank you for visiting my blog. To support for this site, please like WoodshopCowboy on Facebook or follow me on Twitter. If you are interested in making and education, why not check out Work Notes, a semi-curated set of articles from the web, published every week?
This year, I invested more time than ever to developing a pathway into coding for my most reluctant learners. I also researched extensions for the handful of young people who can really stretch my teaching capacity inside the STEAMworks Makerspaces. Many of my students begin their coding journey with small, concept-oriented courses and explorations, such as those found at Code.org and other sites. I then move to visual programming languages (Scratch and Mindstorms) and finally, end up with flexible, high-level languages such as Python and JavaScript. Let’s take a closer look after the jump.
The router can do an incredible number of tasks: cut grooves and dados, used with guides to make parts, do complex or simple joinery and create edge treatments for wood. The router can be mounted on a bench or table top or it can be manipulated by hand. The router is the single most versatile tool in the woodworker’s power tool box.
Most of the time on this blog and @woodshopcowboy or WoodshopCowboy on Facebook, I showcase student-centered projects and articles. Sometimes I make projects for my own enjoyment and personal needs in my own personal makerspace/workshop. Here’s a peek behind the curtain.
Storage Solutions:
Steel Tool Box: A ten-year old Craftsman model in “on-sale red”. This is a mid-price model, and it’s built very well. A few years ago, I bought six black cheap models from Craftman for my shop at work, and those are some el-cheapo models I do not recommend for a nice shop.
The 12’ Shelving Unit: Holds up well in a garage space such as mine. It’s a bit crowded now with supplies and one off tools. A well curated junk area is the sign of a great shop.
Tool Stand: A solid storage design. My original design called for 2×4 posts, but I’ve found 2×2 posts maximize the use of the wood. I use ¼ in or 1/2 in plywood to “skin” the carcass frame. I use the cheapest stuff available, so it’s pretty darn tooting cheap. Throw in a complete don’t care attitude about fit and finish, and these puppies slap themselves together quick. A pair of cheap 2” castors keeps everything on the mobile.
Click to download the Sketch Up model!
The Lumber Cart: A pretty popular design I picked up from Woodsmith and some examples I’ve seen around town. They take a day to make and are worth every penny you spend on wood and castors. Use 2×4’s to frame the bottom and minimize flexing. Buy big beefy castors (4” or more), as this gets HEAVY once it’s loaded with wood.
Tools:
Table Saw: My table saw handles the bulk of my milling, sizing and project-collecting duties. My particular saw has a sliding table feature which goes unused most of the time and a 52 inch fence. I do not recommend a sliding table (even though it works awesomely) if you only have one saw. Removing the miter guide for rip cuts is annoying and re-installing it perfectly square is impossible. I would rather have my second miter gauge slot.
The 52 inch fence rocks and rolls. Jet makes a solid stock cam-lock fence with four T-slots in it. It locks easy and square every time. The safety guard works well, and removes and installs with little trouble.
Router Table: I built my own router table from scrap wood and a few sections of T-slots. This set up allows me to share both the fence and my miter gauge from the table saw, generally making life pretty simple. I can say three things I don’t recommend. First, buy or make a rectangular metal plate. My circular plate allows the machines torque to spin it in the table, which renders it unusable. I’ve fixed it with a set screw, but really, that’s just one extra step. Next, buy a Porter-Cable or Porter-Cable compatible machine. My Craftsmen routers work fantastic (8 years and counting) but they only work with Craftsman-branded accessories. Porter-Cable is the industry-standard brand, and when I improve this space, I will make a smarter purchase. Next, build your router top from strong ¾” solid wood plywood with supports underneath your router top. You can’t tell in the pictures, but MDF sags over time. So far, it hasn’t sagged enough to interfere with my work too much, but I will eventually replace it.
Band Saw: A cheap craigslist find, missing a proper fence. This machine works well enough for the moment, although it tends to drift during larger cuts. Proper sized blades and tension appropriate for the work limit this tendency.
Miter saw: I still swear by my little 10” miter saw I bought ten years ago, but I have upgraded to a true miter saw stand recently. I built this table using the same 2×4 stick and screw technique I use to design all of my tool stands. I really like building cabinetry in this way. It minimizes my investment in materials while maximizes structural space. Best of all, but using two of the most common sizes (2×4 stock & ½ plywood) I can use salvaged/reused materials and save money.
Lathes: I have two craiglist finds. I like this paring as both machines sport ¾” x 16 tpi headstocks with a #1 Morse Taper. This makes it easy to switch accessories between the two lathes depending on the size (medium or small) of my work. Not many of my bowls are worth showing off. I’m still learning to match speeds, sand correctly, etc. Soon though, I will be able to showcase more small projects on this blog.
Bench Sander: A cheap bench top sander for under $60 at Harbor Freight, this little sucker packs a big sized wallop. If it breaks, it’s quickly replaceable. I’m pretty sure the sandpaper itself will cost more than the machine….
12” Dewalt Planer: This is a pretty accurate machine, although replacing blades stinks. There’s a few sharpening jigs out there which can resharpen these blades, but in reality I’ve paid for the cost of this machine two times over in blades. I bought this machine before I became a member of TX/RX Labs. Since becoming a member there, I have done a majority of my milling operations in their facilities. I much prefer large, freestanding models,
6” Grinder: A Porter-Cable version from Lowe’s. In order to sharpen and grind tools, a person needs a grinder, so I bought one. I’m currently building jigs and such to actually sharpen tools.
Drill Press: Another cheap find. This particular drill press came so cheap because it’s nearly unusable by hand – works fine, but the chuck issticky. I don’t use the drill press a ton normally, so having a non-optimal set up works fine right now. Roubo-Style Workbench: The last fixture in the shop. This workbench has been under construction for any number of years (I think two) and is STILL unfinished. At some point, I need to sink a large groove on the top in order to install a sliding deadman. Which is a great name for a punk band, and probably an extravagance, considering how I’ve used my front vise only a handful of times since I built it! I flattened the top using a home-made router and sled jig, I liked the rough feel of the piece.
I built this particular bench according to the plans found in Christopher Schwarz’s book from old rafters of a commercial building in Houston. I reused almost every piece of lumber in this build, hence its beat up look. The front and tail vise are cheap Grizzly/Lee Valley versions I’ve installed.
Laser Cutter: My latest and greatest tool. A hand-me-down from a local hackerspace, a similar rigging would cost $2500 new. So far, I’ve used this rig to engrave a variety of materials, as well as put together a sculpture piece. I will go into this machine in a longer post, so I’ll keep it short. You always get what you pay for in tools. The cheaper you go, the harder you work getting the machine to pro usability standards. As a hobbyist, though, I’ve found both this tool and its software package extremely approachable and needing only minor tweaking. It’s a bad mamba jamba. If you can invest, do it. It’s pretty incredible.
Thank you for visiting my practice zone and project showcase. If you wish to lend your support for this site, please like WoodshopCowboy on Facebook or follow me on Twitter. If you are interested in making and education, why not check out Work Notes, a curated set of articles from the web, published every week?
This fall, I opened the classroom with a very simple (sort-of) multi-media project for my students. Last year, I piloted a number of different end-of-project reflection formats (long form, short form, written and typed) as well as online and offline versions. I lacked a reasonable and effective in-process journaling format. This year, I wanted to combine the paper lab report/maker journaling process with the final reflections. So my students and I made custom lab notebooks.
These notebooks are made with the following materials:
Materials:
1/4” Plywood
Letter-sized paper with a combination of reflections, graph paper, etc.
2” wide strips of cloth, heavy felt, leather, etc.
Light twine rope
Tools:
Utility knife, scissors
Hot glue and glue gun
Paper clip
Construction of DIY Wood Covered Notebooks
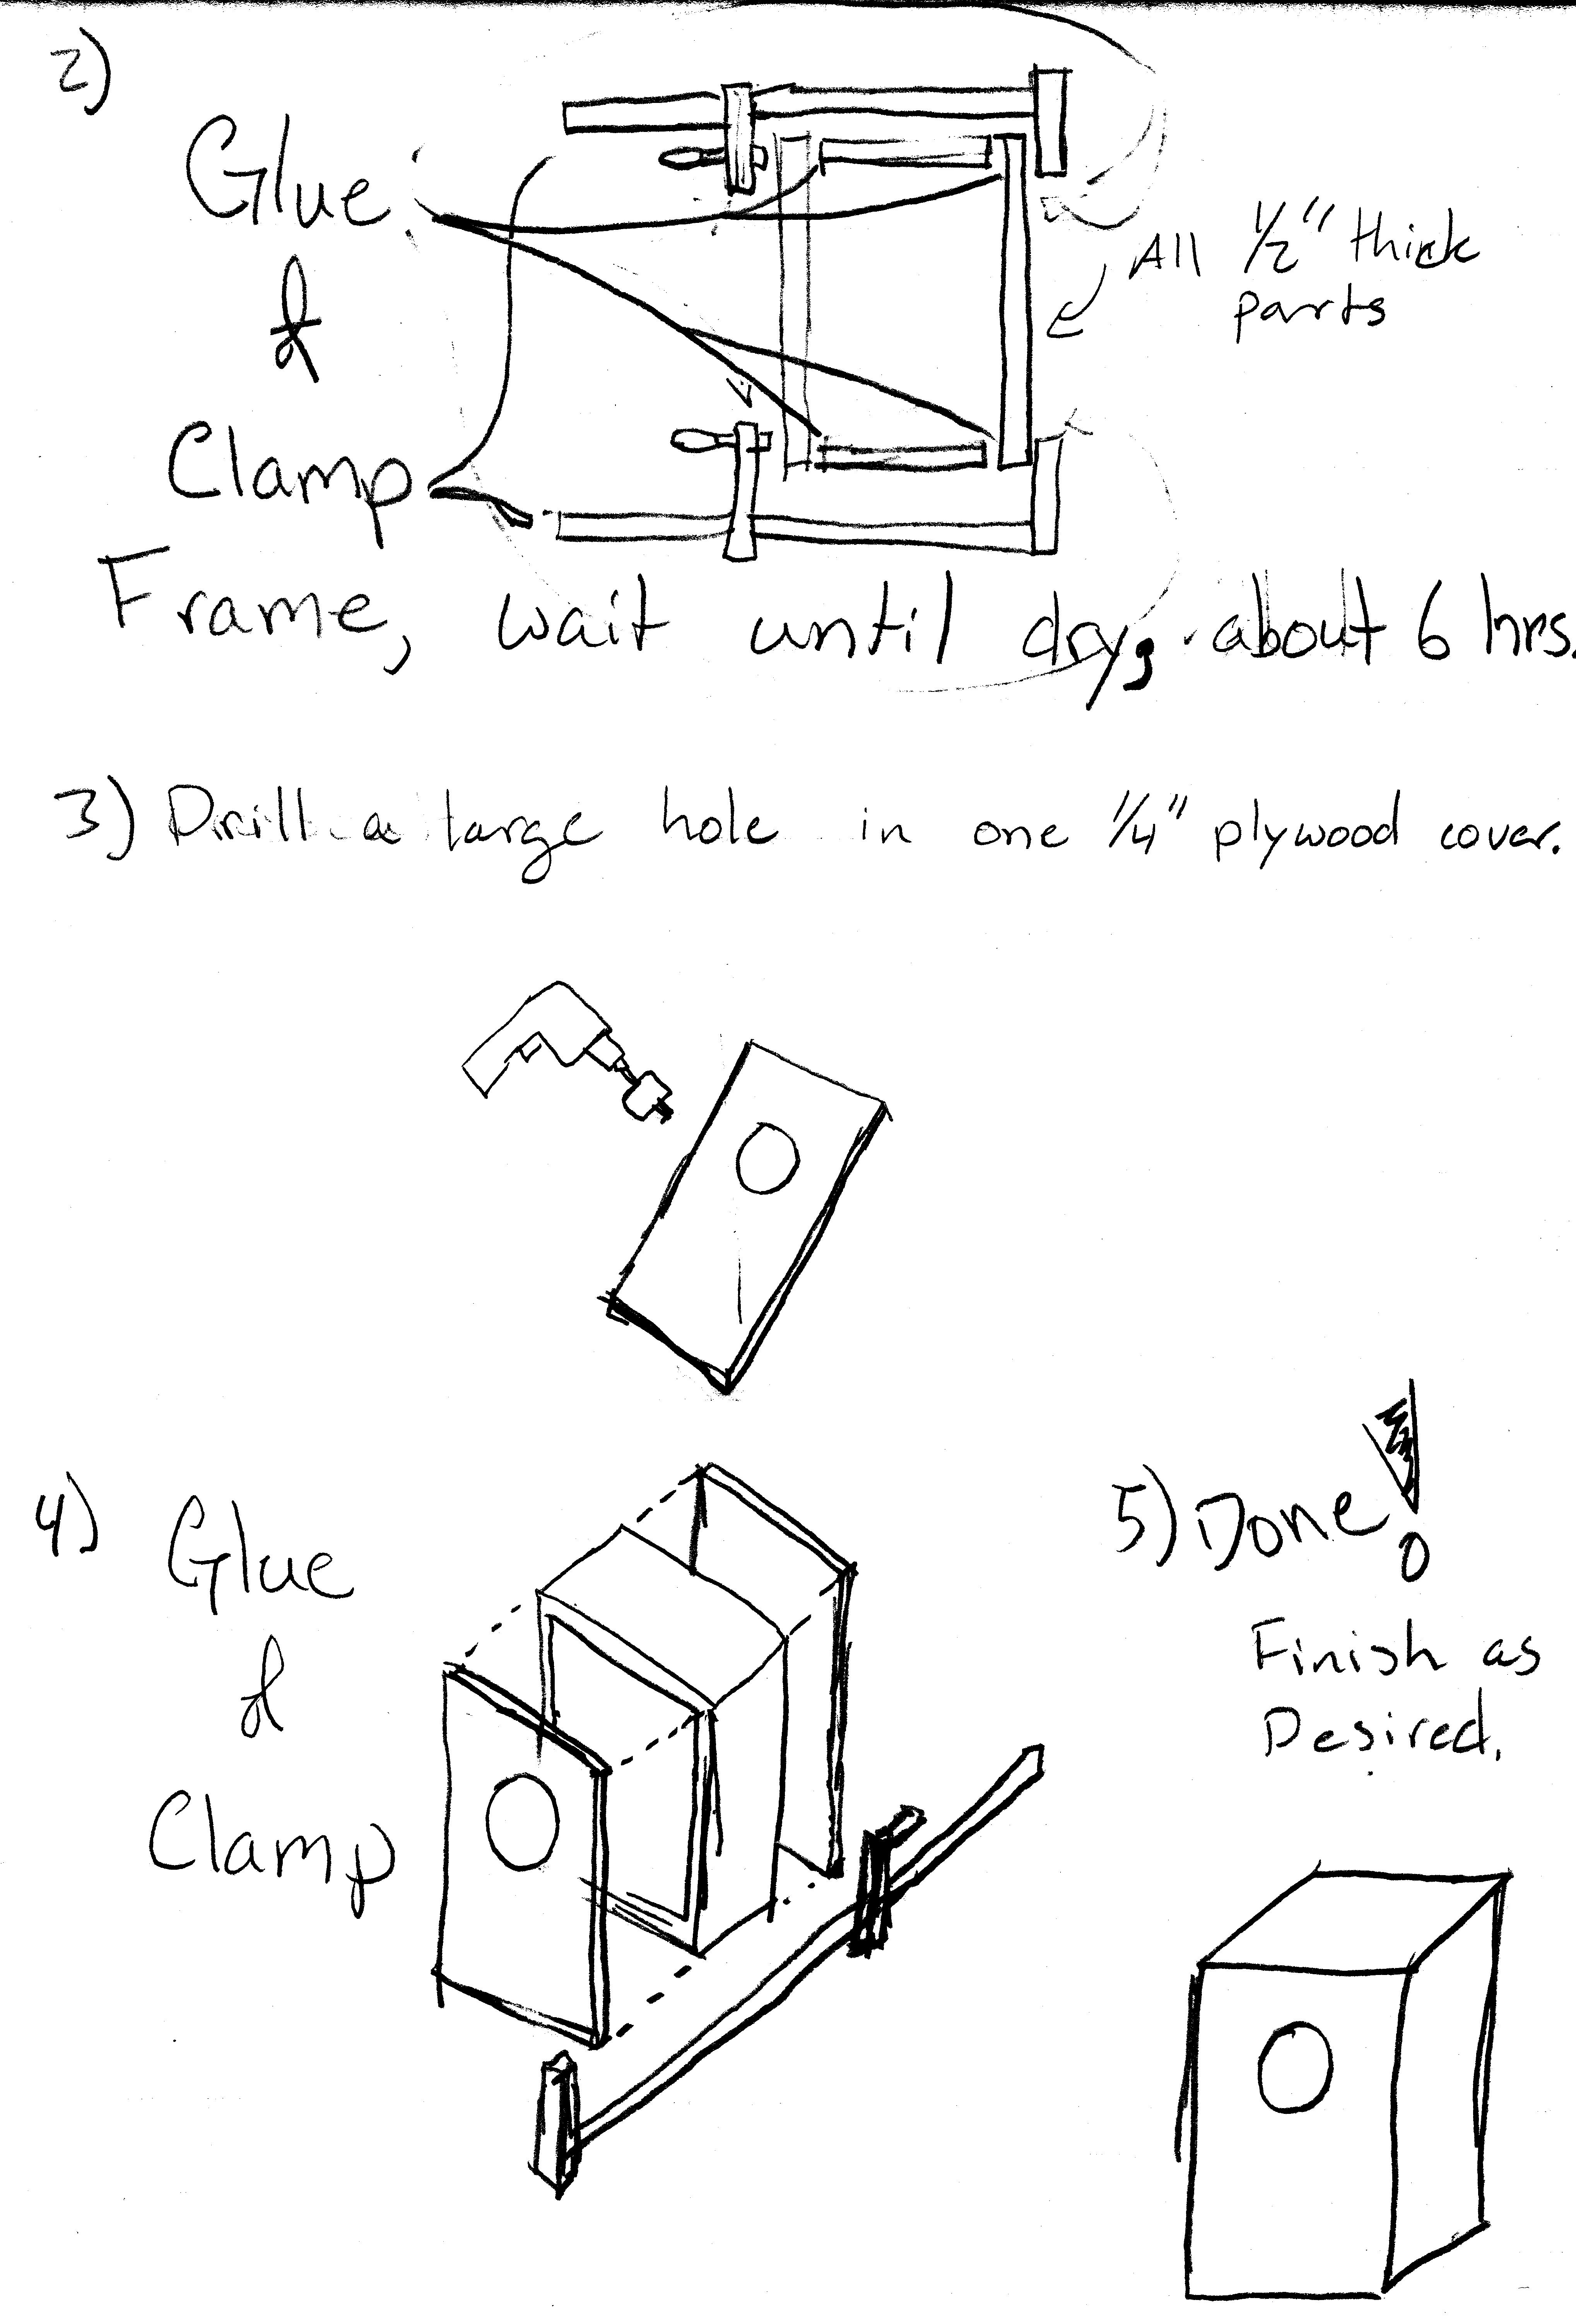
1. Measure your paper. Cut two plywood rectangles an inch larger than you paper. So If you are using letter sized paper, cut two plywood rectangles 9 1/4” x 12”. Plywood cuts easily with a circular saw and saw guide, table saw or jig saw, depending on your level of comfort. Out of these large plywood squares, trim off a 1” strip. Save the trim.
2. Stack your paper up and punch holes into it. If you have access to a three hole punch, manipulate the paper so you have about nine holes. I used my school’s spiral book hole puncher, which was awesome and made tons of holes.
3. Lay one hole-punched sheet over the stripe of plywood, making sure to center the paper in your strip. Mark the centers of the holes with a pencil or awl. Once marked, tape two strips together, show sides on the out sides. Using a brad point bit and drill or drill press, drill out the marked holes.
4. Line up your large plywood sheets and strips. Hot glue the cloth strip to connect the two parts and create a hinge.
5. Now, make the spine sandwich – plywood strip, hole-punched paper, plywood strip. Line up the holes. Clamp the sandwich together with small clamps.
6. Bend a sewing needle from a paper clip. Use twine and sew up the spine. We used a modified running stitch to keep everything tight, but you can see the kids had all sorts of inventive ways of getting everything together.
7. Decorate any way you wish! My students drew pictures, used wood burner, made collages and even used the laser cutter for a few designs.
This slideshow requires JavaScript.
Some reflections: Use quality plywood for best results. My last few posts (such as the Cajon Drums and Camera Obscura) have all featured high quality plywood scraps from a semi-local cabinet shop. For notebooks like this, the oak boards made for some great looking notebooks.
Some students aren’t really ready to sew. Instead, I had the students glue pre-cut covers onto commercially available notebooks. This worked out beautifully, as the students became experienced with hot glue and enjoyed the decorating.
Thank you for visiting my practice zone and project showcase. If you wish to lend your support for this site, please like WoodshopCowboy on Facebook or follow me on Twitter. If you are interested in making and education, why not check out Work Notes, a curated set of articles from the web, published every week?
Over at TX/RX Labs, I have two new Woodworking classes in the works.
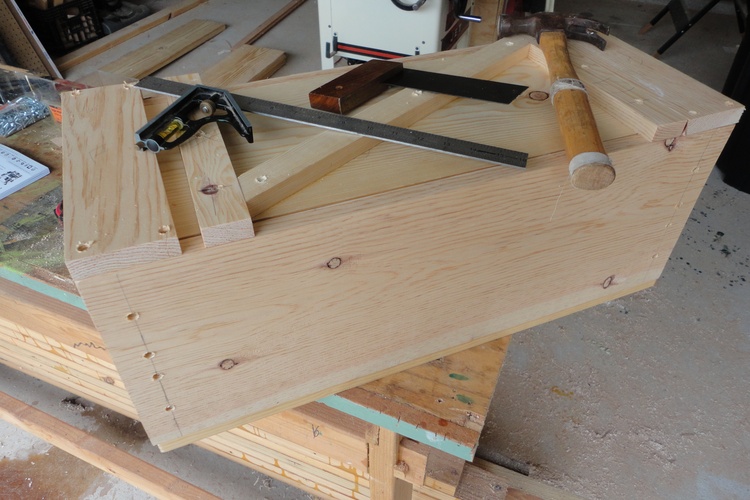
Build a Box –
Great Makers need great tools. Great tools need great storage. Treat your tools right by learning to build a Japanese style toolbox in this class. Students will learn basic techniques for the table saw and miter saw, as well as learn how to apply an oil-based finish.
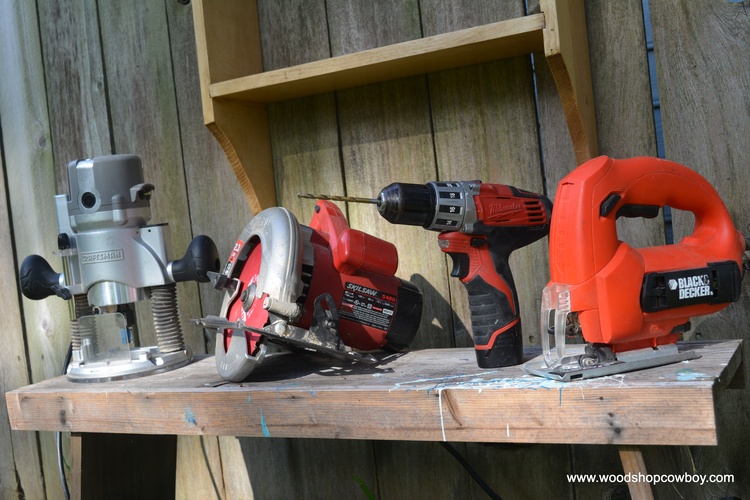
Woodworking: Intro to Handheld Power Tools
Don’t have a lot of space for woodworking? No “real” workshop? Don’t know where to start? No problem! Using only basic power tools (circular saw, router, jigsaw and power drill) students will build a small shelf using high class woodworking techniques. You will learn how to use your most basic homeowner tool set like a fully fledged woodworking shop!
Students can and should bring their own equipment (circular saw, router, jigsaw and power drill) and safety gear. Get comfortable with your tools!
Also, with guardian permission, written waiver and supervision during class hours, this class is open to young makers 12 and older.
Last spring, I had the opportunity to teach one of my dream units: Light and Waves. We completed three projects during this time: camera obsuras, cajon drums and a pinhole camera.
This 3D-printed pinhole camera combines three centuries worth of cutting edge technology. First, the body follows the basic design of a camera obscura and all early photographic cameras. The body consists of a dark chamber (in this case, in the shape of a 1930s film camera) with a small hole on one end. This basic body design was introduced early on in photography and has been refined ever since.
Photographic film has a somewhat shorter history, have first been popularized in the late 1880s by some guy named Eastman and improved upon by this other guy named Kodak. Photographic film consists of multiple layers of light-sensitive chemicals coated in plastics. Think of a very thin, very chemically sandwich, with your fillings being the chemicals and your bread as the plastic. When light passes through the film, it activates changes in the chemicals. Processing the film fixes these changes as images and allows us to transfer the images to paper. For this camera, we use 35mm film, first introduced in the 1930’s.
Lastly, we use 3D-printing, a 21st-century manufacturing process to create the body of the camera. This particular design can be found at www.thingiverse.com, a fantastic for ready-to-print models. Not every model is perfect, but most are ready to go.
Assembly of this particular model is pretty straightforward.
1. Print the design (use rafts if necessary) and attach the front and back halves together. I used rubber bands to hold everything tight.
2. On the inside, I installed the winding mechanisms with a little trial and error. Depending on your printer’s accuracy, some parts might not fit, so small files and pieces of sandpaper help immensely with fitting.
3. Cut a small piece of sheet metal with thick scissors and pierce with a small radius pin in a drill. I used galvanized metal flashing from Home Depot left from previous projects, but soda cans work well too. The smaller your hole, the better quality the picture.
4. Glue the pinhole to the front of the camera. Cover with electrical tape.
5. Load up with 35mm film by threading the film tape through the slot. Make sure the brown side of the film faces the front. Close up the system, making sure the film stays attached in the winder. Wind the system by about three cranks.
6. Take pictures. You take a picture by taking off the tape covering the pinhole (aperture), then replacing the tape. Outside, your exposure (the time the film will be exposed to light) is about a second in bright light. Inside, this increases to five to seven seconds.
7. Wind up the film about two cranks after every picture. Do NOT let the system unravel. I used a piece of duct tape across the knob to keep everything tight.
8. Once you run out of film one way, rewind the film. Remove the canister.
9. Develop your film. There are a couple places that still do regular film. As of now, Walgreens still develops 35mm film. Look around for your source.
Thank you for visiting my practice zone and project showcase. If you wish to lend your support for this site, please like WoodshopCowboy on Facebook or follow me on Twitter. If you are interested in making and education, why not check out Work Notes, a curated set of articles from the web, published every week?
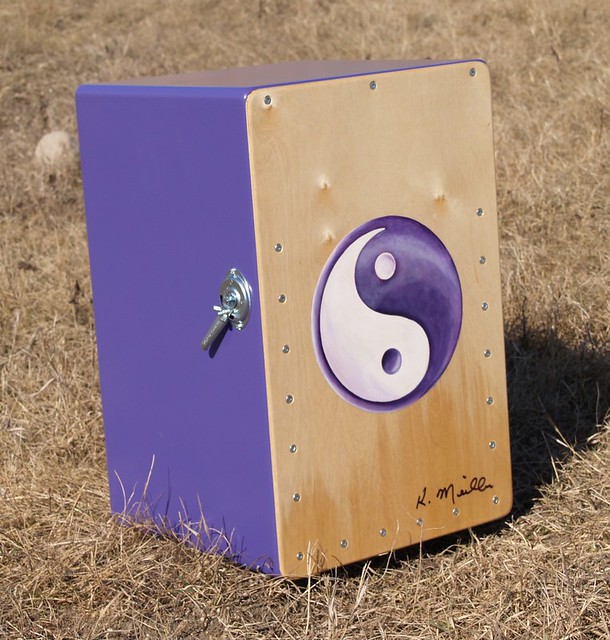
Cajón drums are wood drums native to South America with deeper roots in the Africa. The cajon is a wood rectangular prism, with two thin faces. One of the thin sides, usually the back, has a large hole to allow sound to travel out. The front face can be struck with the hand, mallets or brushes to create different sounds.
Construction couldn’t be simpler. Cut out four sides of a box using whatever means you have from a sheet of plywood. I use a table saw now, but my students and I have used jig saws with guides, circular saws with guides, even a handsaws.
I often make a long rip (cutting out the depth of the box) cut first. I then cross-cut the piece into its four components in order to end up with four pieces which form a square, rectangular frame. I then cut a thin rectangle from a piece of thin (1/4” or thinner) plywood. I glue the four thick sides together into a frame, wait a day, then glue the top and bottom on, weighted down with books or clamped to the workbench.
Lastly, drill a large hole using a drill press or hand-held drill. Be sure to clamp your work piece down. Bits tend to bind when cutting large holes (meaning the bind will throw the drill or the workpiece around). Be safe and go slow!
picture courtesy of flikr user theclyde, cc license
MakerEd teachers live and breathe materials. You can’t have hands-on, constructivist education with out materials to hands-on construct. I have three rules when acquiring material.
Rule 1: Always accept donations of lots of materials. Twenty golf balls? YES PLEASE! A pile of dried logs? Yes, I could use that. One robot kit, which only one kid can build at a time? Not as interested. Small quantities of materials can certainly be interesting, but more often than not, the material will
go unused and unloved.
Rule 2: Buy in bulk, but only materials which can be used in different projects. For example, I buy tons of paper, tons of glues, tons of craft sticks and materials. I don’t invest in a variety of electronic components which will only be for one or two projects. I try to find something I can reuse next year, or repurpose into different projects.
Rule 3: Kits for however many kids I have. Many MakerEd teachers advocate for a each student to have their own project of their own design, which means small amounts of a variety of materials. It also means specialized purchases, individual shipping, lots of vendors, lots of hassle. I’ve seen many a great project linger and student get discouraged or distracted because of a week of authorization, purchasing and shipping. Instead, I opt for “platform” projects which can launch a kid’s imagination. For these drums, I created twenty large boxes from donated/salvaged plywood. These boxes ended up as drums, cameras, boxes, woodburning projects, etc. Another example are the physics carriages we make to study motion. The kits become CO2 carts, derby racers, motion trackers, safety cart testers, etc. While my kids start off in the same place, they get to make their destination their own.
Students can come up with their own variations on the drum theme. Many students added metal springs to make a snare drum, changed the hole size or experimented with drum shape and cover material. Lots of places to go, once the student catch the bug of basic construction. Lastly, bigger drums work MUCH better than smaller drums. I really enjoy the sound of a box about 2’ high, 12 – 18” wide and 12” deep. That should give you a rich boom when you play it. Happy playing!
Thank you for visiting my practice zone and project showcase. If you wish to lend your support for this site, please like WoodshopCowboy on Facebook or follow me on Twitter. If you are interested in making and education, why not check out Work Notes, a curated set of articles from the web, published every week?
The camera obscura is a old, old project which illuminates the nature of light. Students can discover some major scientific principles: light travels in straight lines, transparent surfaces allow light to travel through while translucent surfaces let some light through, the principles behind photography, scale, proportion and a whole host of other things.
cc wikipedia
Essentially, a camera obscura is a black box with a very small hole piercing one wall. This hole allows a small amount of light to enter the box.
Now here’s where it gets funky. We need to know two rules about light to understand what happens next. First, light travels in a straight line. Second, light reflects off all objects – it’s the reflected light which our eyes process into visual images. So what happens if light is made to travel through a extremely small space?
An illustration of how a camera obscura works. cc wikipedia
Picture frames make fantastic skill building projects. You can practice joinery and create precision jigs. Frames reward practice and good finishes. They can be made from cheap materials and scraps – meaning they are easy on the pocketbook. All in all, the perfect project to start with.
Three Picture Frames, Left to Right: Schoolhouse Frame, The Salvaged Door Frame, the Dead Simple Frame
With one exception. Miter joints – that is, two 45° angles meeting and forming an exact 90° corner….umm, that’s hard. Very hard. So how can you make a simple picture frame with simple joinery that looks great? Over the years, I’ve developed three semi-surefire picture frame designs that are simple to make and look great. Next time you want to frame that special moment, try the next three picture frames: The Salvaged Shutter, The Dead Simple Frame and the Schoolhouse Frame.


