#Makered Book Review: Tinkerlab by Rachelle Doorley @TinkerLabKids

TinkerLab: A Hands on Guide for Little Inventors by Rachelle Doorley is a beautifully photographed and curated set of experiments for the toddler to 2nd grade set.  While her main focus is art prompts and experiments, she has sections on construction, Maker explorations, take apart sessions, chemistry, and more.tinkerlab-review


This summer I transitioned from a full-time classroom teacher to a full-time stay-at-home-dad for two young boys.  Rachelle’s book has given me tons of inspiration and insight into the playful mind of very young children.  She walks through the process for setting up an art space, with tool & material recommendations.  She also spends a lot of time and space discussing the teaching philosophy behind arts education and why its important.  Her habits of mind and interviews with experts are fantastic distillations of the Maker ethos.

Take a Further Look at www.Tinkerlab.com.

Try Out These Activities:

Make Your Own Paint

Hanging Structures

Spin Art

Thank you for your continued support.

Thank you for visiting my blog.  To support for this site, please like WoodshopCowboy on Facebook or follow me on Instructables. Twitter, Pinterest or Instagram.  If you are interested in making and education, why not check out Work Notes, a curated set of Maker articles from the web, published every week?

Home #Makerspace: #DIY Custom Kid’s Bike with #Maker Tools

Every few years, I find an excuse to engage in one of my favorite old-school projects, rebuilding and repainting a kids bicycle.

Let’s paint some flames.dsc_3067

I mean, dragons.  We will paint dragons.

This project is approachable for middle-school and high-schoolers.  High-interest elementary school kids can definitely accomplish parts of this project with help from an involved adult.  This project does involve dangerous fumes, so great ventilation and respiratory masks are a must.  Be prepared to give over your work space for a three days to a week and a half to this project.

This project teaches basic competencies in graphics software, cutter plotter use, mechanic’s tool usage – wrenches, ratchets, etc., and paint prep and execution.  These skills are directly transferable to manufacturing, automotive and graphic arts fields (for my fellow CTE/Shop teachers out there).  Bike mechanics earn about $12 per hour nationally, offering a student an entry point into the skilled trades.

In school, I began with donations from student families. I then taught my students how to use tools and the basics of gears, force, torque and work.  We fix’m up and get the bikes running.  At the end of the experiment, we would give the bikes away to kids who need them.  Workshop Houston began with a similar model and Cycle of Houston has given away 100,000 bikes in just over ten years of existence.  Bikes can and do change a child’s world by offering opportunities to develop balance, judgement and freedom in the wider community.

Update:  I’ve since found my write up from 2011.  This is my second or third version of this project.

Continue reading “Home #Makerspace: #DIY Custom Kid’s Bike with #Maker Tools”

This Week in the Shop: The Split-Top Bench with Plans

split-top-bench

This week in my home shop I finished up a new bench project I developed for class at Nova Labs in Reston, VA.  While simple in design and execution, it does involve the full suite of woodworking tools and a custom jig to complete.  This great intermediate project uses the Fab Five of a powered woodshop:  table saw, band saw, miter saw, jointer and planer.

starred-photos1I built the entirety of this project at Nova Labs, Inc using their woodworking tools.

Nova Labs is a membership-driven all-volunteer makerspace based in Reston, Virginia that was founded in 2011 with the purpose of empowering everyone to Rediscover the Joy of Making Things!

The current 10,500 sq. ft. facility located at 1916 Isaac Newton Sq West houses classrooms, workspace, incubator offices and a shop that includes both common tools and advanced fabrication equipment. Members enjoy 24-7 access and help co-manage our space by teaching classes, maintaining equipment, and promoting making in the community.

I cannot say enough good things about the membership and openness of the culture they have built up.  It’s rare to find a makerspace that has such a grassroots structure and active volunteer culture.

If you are interested in learning woodworking, you can join me in class in 2017.

Nova Labs members support a wide range of open source development projects that benefit both the local community and the world! Consider joining today to learn how and meet the people behind these projects!

Continue reading “This Week in the Shop: The Split-Top Bench with Plans”

The Home #Makerspace: How To Build Your Own Pinball Machine (with Working Launcher & Flipper)

dsc_2716-collageSometimes, a teacher needs to court a little controversy.  This week, Things 1 & 2 & I build a device which was banned in New York City from the 1940s until 1976, and can be found in high quality dens of iniquity and vice, such as bowling alleys and boardwalk amusements.

Pinball.  I’m talking about pinball.  Cue the Who!

This project is most appropriate for older makers in 5th grade and up depending on their skill and available supervision with box cutters.  Makers in grades 3/4 would benefit greatly from guided adult supervision.  I estimate 10 work-hours for young makers to build this machine.  Simplifying or eliminating the mechanics will greatly reduce the time necessary.

dsc_2733

While not difficult in terms of physical execution, this project involves a lot of cutting and gluing.  The mechanical complexity can be daunting for younger makers.  My 5-year old lost interest building the mechanical parts, but thoroughly enjoyed assembling and decorating the game.  I have included plans in SVG & DXF to help you build your own baseball pinball game.  Just print out full-size or copy the dimensions!

Continue reading “The Home #Makerspace: How To Build Your Own Pinball Machine (with Working Launcher & Flipper)”

Home #Makerspace: How to Saw (for Young and Beginning #Woodworkers)

I use Japanese-style saws exclusively in my classroom and home shop because I have young makers.  I love the quick bite and accuracy of a pull stroke, the low cost and high quality, but mostly, enjoy handing my saw to young apprentices and watch them succeed, no matter what their size, shape or need might be.

In general, beginning students, especially young makers and makers with physical challenges, find the Japanese-style saws easier to use successfully.  Japanese craftsman developed methods and techniques which centered around very low workbenches, short saw horses and a comfortable seated posture.  If you are a young maker, or use a wheelchair, traditional Japanese craft mimics your natural physical position.  Straight handles mean you can grasp your saw in multiple ways and still be successful.  The pull stroke maximizes the maker’s leverage without needing strong, heavy arm stroke.  Lastly, the workbench on the floor is always at the right height, just about waist high…even if you are knee-high to a grasshopper!  Lastly, high-quality Japanese-style saws are half the cost of similar Western-style saws.  The main disadvantage of Japanese-style saws is that they cannot be sharpened .  
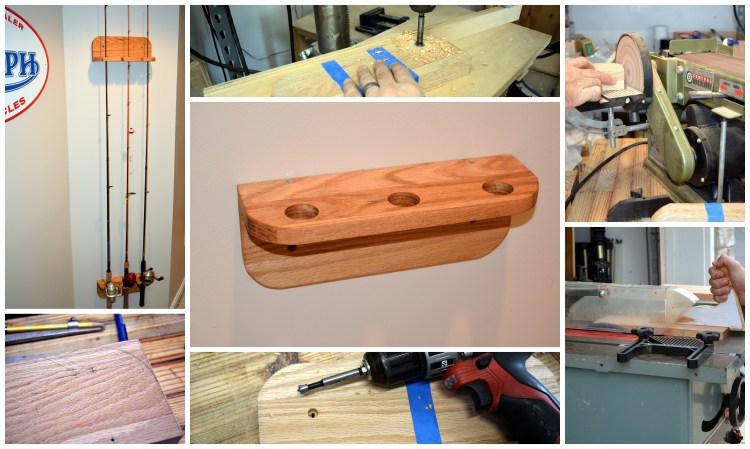
How to Saw

Sawyers (ye olde term for a person who saws…) use clamping pressure and body position to saw a board safely and squarely.  If you want to cut a board using a workbench or table, position the cut line so it hangs off the bench.  Use a bench hook to make accurate crosscuts, a cut across the width of the board or across the grain of a board.  A miter box can be used to increase accuracy.  Then clamp the work piece down to reduce movement.

Next, set up your body.  Keep your shoulders square to the work.  Place your non-dominate hand on the work, away from the cut line.  Use your body weight to hold the workpiece down. Now, grasp the saw handle firmly and line the saw blade to the cut line.  Move yourself so the cutline, saw blade and your forearm form a single line.  Lock your wrist to keep your saw blade perpendicular.  Now, push the blade slowly forward, concentrating on moving your blade and forearm in one line.  Pull the blade back, again concentrating on keeping your arm and blade in-line.  Once you’ve cut a small groove in the wood, speed up and saw away.  If you find it hard to pull or push your blade, your blade is binding in the cut.  Slow down, straighten your arm and twist your wrist until the cut becomes easier.

If the workbench is too high, try working on a knee-high bench or the floor.  Set up is similar to the table, except you place your knee on the work piece instead of a clamp.  This increases the clamping pressure and frees a hand to help guide the saw.

Thank you for your continued support.

Thank you for visiting my blog.  To support for this site, please like WoodshopCowboy on Facebook or follow me on Twitter, Pinterest or Instagram.  If you are interested in making and education, why not check out Work Notes, a curated set of Maker articles from the web, published every week?

This Week in the Shop: Get Started #3DPrinting at Home!

A quick post today!  I recently purchased a knock-off Makerbot Replicator clone.  Today, I will share a few of my more successful prints and my thoughts on 3D printers in the home makerspace.

This slideshow requires JavaScript.

Continue reading “This Week in the Shop: Get Started #3DPrinting at Home!”

#Makerspace Tour: MILL Studio at Gum Springs Library

Loudoun County Public Library system was recently rated one of the top libraries in America.  It boasts a lot of services and a great collection.

This slideshow requires JavaScript.

I like its makerspace, the Mill Studio at Gum Springs Library.

The MILL Studio is a great example of a library-based makerspace.  Focused mainly on the techy-arts continuum, MILL Studio offers light craft courses, 3D printing services, STEM-based programs for young people.  Soon, they will incorporate a Glowforge laser cutter this fall/spring.  MILL Studio also offers a recording studio, which opens up an entirely new avenues of exploration.

Tuesday nights are reserved for teens & adults, while Thursdays are reserved for Makers between 3rd and 6th grade.

Check out their website for more information.

Thank you for your continued support.

Thank you for visiting my blog.  To support for this site, please like WoodshopCowboy on Facebook or follow me on Twitter, Pinterest or Instagram.  If you are interested in making and education, why not check out Work Notes, a curated set of Maker articles from the web, published every week?

Home #Makerspace: The Fishing Rod Storage Rack

Last week, I built a small shelf using hand tools.  This week, I will use a mixture of bench and power tools to create a storage rack for my family’s fishing rods.  This rack has two assemblies, the upper rack and the lower rack.

starred-photos

The lower assembly has three holes for accepting fishing rod handles.  The upper assembly has the same three holes with access channels.

dsc_2608

Using power tools, this project will take fifteen to twenty minutes to complete.  It can be completed with only hand tools, if so desired.  Young makers in the middle school range comfortable with hand-held power tools, especially the jig saw and power drill, could complete this project with minimal adult assistance.

Continue reading “Home #Makerspace: The Fishing Rod Storage Rack”

Home #Makerspace: A Young #Maker ‘s First Saw Kit

3 Saws and a Miter Box.

A beginning woodworker needs enough equipment to make only two types of cuts; the cross cut and curve.  

For cross cuts, I suggest a Japanese-style “pistol grip” carpenter’s saw for older makers, age 7 & up.  For very young makers, 4 to 7, I suggest the smaller flush-cut saw.   These two saws are a good start without sacrificing functionality and capability.

Both saws really stand out making crosscuts.  The Japanese-style “pistol grip” carpenter’s saw can cut through wood, plastic and plywood with ease, easily create joinery and dimension lumber, all while being perfectly sized for young people 7 & up.  For the very small, I suggest a Japanese-style flush-cut saw.   Sharp, small teeth attached to a small, comfortable handle.  

Coping saws round out the kit.  Specialty carriers carry great saws for between $10 – $15.  If that is too much (say, you are buying in bulk for a makerspace) look for one-piece hard-plastic or wood-handled coping saw, not over-molded soft plastic.  All of my blue plastic-handled coping saws have failed within two years of use.

dsc_1891
Coping Saws

A miter box helps makers saw accurately, focus on technique and minimize injury.  Miter boxes can be found at any big box or woodworking specialty store for just a few dollars, or can be made easily.  Check out my instructions here!

dsc_1683
Miter Box in Use

Once a maker gains a skill, the dual-edge ryoba saw adds long rip cuts and hand-cut joinery to the maker’s toolbox.

dsc_1888
The Ryoba Saw.

The best part of all?  Cheap saws work just as well as the expensive versions.  A full kit (flush cut saw, coping saw, ryoba saw, carpenter’s saw) costs just under $30 at import tool dealers.  With these tools, beginning makers can cut any problem down to size.


Thank you for your continued support.

Thank you for visiting my blog.  To support for this site, please like WoodshopCowboy on Facebook or follow me on Twitter, Pinterest or Instagram.  If you are interested in making and education, why not check out Work Notes, a curated set of Maker articles from the web, published every week?

Home #Makerspace: A Small Bookshelf Using Only Hand Tools

This week we will build a small, simple shelf to practice our hand tool skills.  We will learn the rip cut and how to use the coping saw successfully.  We will assemble and hang our shelf using wood screws, the quickest fasteners around.

This project can be completed in a 15 to 20-minute session by a 8 and up maker.  Young makers will need help and encouragement to complete the long rip cut.  To install, I use drywall anchors and screws.


The Small Bookshelf


Material

  • 1” x 12” x 14” pine board or similar.
  • 2 #8-1 1/2” wood screws, #2 Phillips Head

dsc_1729

Tools

  • Woodworking Vise or Clamps
  • Ryoba or Panel Saw
  • Bench Hook
  • Jointer Hand Plane
  • Coping Saw
  • Sanding Block w/ Coarse Grit Sandpaper
  • Clamps
  • Hand Drill & Brad Point Bit
  • Countersink
  • 3-Jaw Chuck Brace & #2 Phillips Head Screw Driver
  • 1/2” Forester Bit
  • Combo square, panel gauge or mortise gauge to mark rip lines
  • Pencil


Dimensioning


The first step in dimensioning lumber  is to Rip to Width.  While I give specific measurements here, the general steps remain the same no matter the project or board.

  1. Use a combo square to mark a strip 4 1/2” from each edge. dsc_2464
  2. Position the board for a rip cut as shown in a vise.
  3. Saw along your marked line using the rip side of the ryoba saw or a rip-toothed panel saw.  Go slow and concentrate on your form.  If you veer off the line, try using slight wrist pressure to push the cut back to the line.  If you find yourself in really bad shape, you can flip the board and begin on the opposite side.
  4. When you reach the halfway point of your cut, flip the board in the vise and begin cutting on the other end.


Next, we Crosscut to Length.  Depending on your project, it might make more sense to cut to length before ripping to width.  These two steps are interchangeable.

  1. Mark the one of the 4 1/2” strips at 12”, then mark it square with the combo square.dsc_1759
  2. Position the board on a bench hook or work surface for a crosscut as show.dsc_1765
  3. Saw along your marked line using the crosscut side of the ryoba saw.  Go slow and concentrate on your form.


Next, we will Joint the Edge.  If you don’t have a jointer plane, use a long block with very rough sandpaper glued to its face.

  1. Match the machine cut edges together.  Secure the two boards, ripped edges up in the vise.
  2. Joint the edge with a hand plane.


Marking and Layout

  1. Mark the curves with a compass and pencil or use a round object as a template. dsc_1767
  2. Mark the location of the screws on the top shelf.  They are 2” inches from each end and 3/8” of an inch from the long edge.
  3. On the wall board, mark out locations for anchor screws.  The boards are 2” from each short end, centered on the board.


Cutting the Curves

  1. Use a coping saw to cut the curves.  Secure the work piece in the vise.  Go slow and concentrate on your form.
  2. Once the curve is cut, use sandpaper and a block to even out the curve.


Assembling the Shelf

  1. Secure the wall board in a woodworking vise, with the long edge facing up.  Place the top shelf in proper position and secure with clamps to the wall board.
  2. Use the hand drill to drill pilot holes. dsc_1776
  3. Use the countersink to ream the pilot holes.dsc_1779
  4. Use screwdriver or brace & bit to driver screws.dsc_1781
  5. Remove the shelf from the vise and place on the bench hook.  Clamp to work table if you can.  Use 1/2” Forester bit & brace to drill at 3/8” deep hole.  Switch to a brad point bit the same size as your anchor screws and drill through.


Sand and Finish

Sand and finish as desired.


To install, I placed the shelf on the wall, checked to see if it was level, then marked the anchor locations.  I then installed dry wall anchors at those spots and attached the shelf.

dsc_1814

This design is only appropriate for short, shallow shelves loaded with light objects, such as knickknacks and personal electronics.  Heavy objects will rip it out of its anchors.


Thank you for your continued support.

Thank you for visiting my blog.  To support for this site, please like WoodshopCowboy on Facebook or follow me on Twitter, Pinterest or Instagram.  If you are interested in making and education, why not check out Work Notes, a curated set of Maker articles from the web, published every week?