
Every tool has a purpose. The Tool Primer Series explores common #makerspace and #woodworking tools. You can check out the entire series here.


When a problem’s too big in my shop, I cut it down to size with a hand saw. Hand saws have several inherent advantages over power saws. They don’t run out of batteries, so makers can use them all day. The light weight means novice and smaller makers can comfortably use the tool reasonably safe. Hand saws can make delicate joinery and also rip through 3” slabs. No circular saw or table saw has that type of range.
Hand saws are not made equal. Each hand saw excels at certain tasks. In this tool primer, we will examine the Western & Japanese-style divide, learn to match the saw to the cut direction and classify saws by type and function.
Hand Saws
The Great Divide: West vs. East
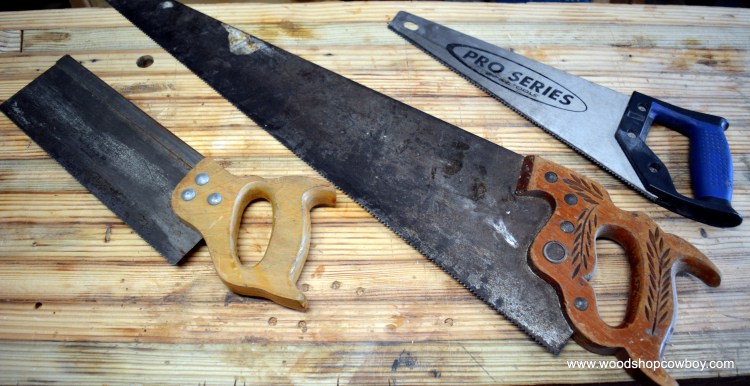
Hand saws come in essentially two styles. Conventional Western-style saws offer thicker saw blades (called the plate), contoured D-shaped handles and cutting power on the push stroke. Japanese-style saws offer a thinner blade with a straight handle, cannot be resharpened, and cut on the pull stroke. They both get the job done. Many makers simply use the saw that works best for them, no matter the style.
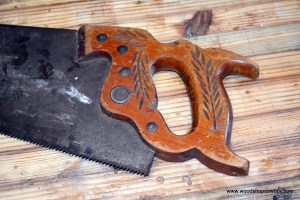
Great quality Western-style saws can last a lifetime. These saws can be sharpened numerous times and once mastered, they produce fine work. Old, high-quality saws can be found knocking around at flea markets, garages and yard sales everywhere. Retailers like Rockler, Woodcraft and other woodworking outlets can bring high quality straight to your door, no matter where you are. These are great saws for intermediate and expert makers ready to invest in their skill and technique for years to come.
Woodworking in the West (America and England) developed around hip-height workbenches. Western-style saws are often sized and designed for adult males who can stand up for hours at a time, carrying their weight and strength in their chest and arms. While this favors adult male teachers like me, not all makers fit my physical description and can feel unsuccessful when faced with a Western-style saw.
In general, beginning students, especially young makers and makers with physical challenges, find the Japanese-style saws easier to use successfully. Japanese craftsman developed methods and techniques which centered around very low workbenches, short saw horses and a comfortable seated posture. If you are a young maker, or use a wheelchair, traditional Japanese craft mimics your natural physical position. The straight handles allow you to grasp your saw in multiple ways. The pull stroke maximizes the maker’s leverage without needing strong, heavy arm stroke. Lastly, the workbench on the floor is always at the right height, just about waist high…even if you are knee-high to a grasshopper! Lastly, high-quality Japanese-style saws are half the cost of similar Western-style saws. The main disadvantage of Japanese-style saws is that they cannot be sharpened and eventually the blade or saw must be replaced.
Cutting Direction and Why it Matters
All saws cut best one of two directions, either a rip or cross cut. If you have difficulty during sawing, first examine your sawing technique then check the teeth. Often, you are using rip saw to cut a crosscut or vise versa. The right saw makes all the difference.
Rip Cuts
Rip cuts follow, or GO WITH, the grain of the wood.
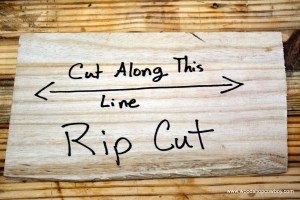
The grain of the wood means the direction in which the long, fibrous cells are oriented in the board. These cells look and act like bundles of drinking straws at the microscopic level. If we split the straws so we end up with two bundles of equally long straws, this is a rip cut going WITH the grain.
A saw’s use is determined by its teeth. Rip saws often sport large, triangular teeth with only a few cutting edges. These saws have fewer teeth per inch as compared to cross-cut saws.

Crosscut
Crosscut saws cut ACROSS the grain. Remember the bundle of straws? The crosscut chops the bundle in half so you end up with two bundles of shorter straws, but the same number of individual straws in each bundle.

Cross cut saws have lots of smaller teeth. Japanese-style teeth remind me a little of a baleen whale’s smile or the pointy teeth of a particularly small vicious shark. Cross cuts make smooth cuts when used correctly, but get clogged up if used as a rip cut.

Types of Saws
Generally speaking, bigger saws cut bigger pieces of wood. Conventional Western-style saws come in a variety of sizes and suggested uses:
- Dovetail saws – small, very sharp back saws (saws with metal or plastic spines that stiffen the saw blade) used to cut delicate, complex joinery

Dovetail Saw from Flickr user LukeMilborn, used with cc license - Carcass saws – medium-sized back saw used to cut larger joinery, such as tenons, and cutting small stock to size, etc.

A common back saw, which can be a tenon or carcass saw depending on size. - Tenon saws – the largest back saw used to dimension stock and large joinery.
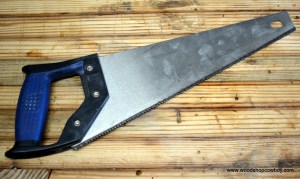
- Panel saws – Panel saws are large, spineless saws with thick, stiff saw plates. When you think “hand saw” this is the saw most beginners think of. Panel saws are used to dimension rough stock, square edges and the like. Panel saws can also break down plywood easily because they have no spine, but produce the roughest cut of the group.

A large panel saw. - Carpenter’s Saw – These saws are the Hobbesian cousins of the refined panel saw. They are nasty, brutish and short, designed for abuse on a job-site cutting 2x4s and the like. My students often struggled to master this tool because of its short stroke, “do everything badly” teeth configuration and thick kerf. Nothing beats these saws for developing “now I’m a construction person” swagger.
A modern carpenter’s saw. Notice the black line along the teeth. This means the teeth have been hardened and cannot be resharpened. This saw is effectively disposable.
All of these saws come in rip and cross-cut teeth patterns, so the can be used in a myriad of situations.
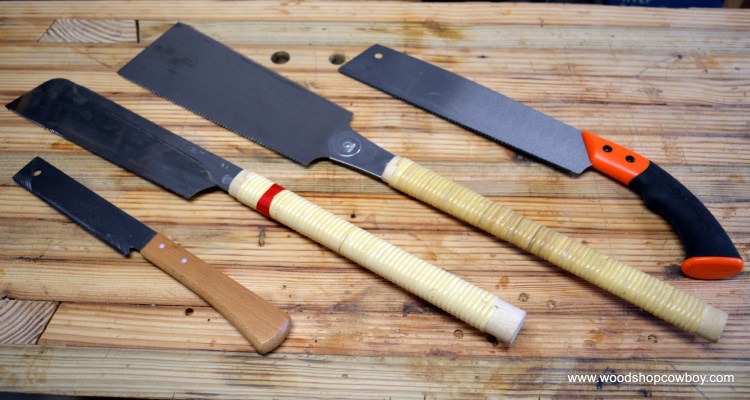
Japanese-style saws:
- Flush-cut saws – These saws sport a flexible blade so the user can saw off dowels, tenon and wedges flush to a workpiece. Usually found in a high-TPI, cross-cut teeth configuration.

A small flush-cut saw. The blade flexes during use. - Dozuki saw – Looks and operates much like a conventional back saw. Available in both rip and crosscut configurations.

A dozuki saw. - Ryoba saw – A unique dual-bladed saw. A long, thin, wide blade with no back. One edge is filed for rip cuts, one edge configured for cross-cuts. Can be used to cut plywood, joinery, and dimension lumber. A truly versatile saw.

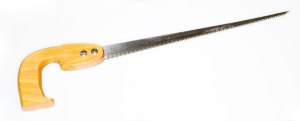
A ryoba saw. My favorite saw of all time, for all time. - Carpenter’s Pull saw – I call this the “pistol grip saw” in the makerspace. Combines a pull saw blade with a pistol-like grip to create a very comfortable and accessible sawing experience. Usually sold with a rough crosscut pattern. A fantastic dirty saw for dirty jobs.

The pull saw with a “pistol grip” formation. Very useful in the shop.
Cutting Curves
Cutting curves requires skinny blades. Woodworkers have developed two types of solutions.
Keyhole saws utilize skinny, thick blades. Both Western and Japanese-style versions look similar. Looking a bit like long snouted fish, these saws poke through small holes and cut slow curves as necessary, such as keyholes…hence the name.
Frame saws stretch a thin blade on a frame and give greater maneuverability than keyhole style saws. Frame saws come in three main styles:
- Bow Saw – Bow saws stretch a blade between two “cheeks” and tensioned with a Spanish windlass or steel rod. The blade can be replaced with wide blades or narrow ones, allowing the saw to literally make any type of cut necessary in most woodworking. Bow saws suffer from limited availability. Only a few stores carry new ones. Intermediate makers can make their own. Truthfully, I’ve seen only one in the wild, a monstrous lumber saw from my grandfather’s workshop.

By Tiesse (Own Work) [Public Doman] via Wikimedia Commons - Coping Saw – A thin blade tensioned across a C-shaped metal frame. Common and ubiquitous, these saws can be found at any big box or woodworking specialty store.

A pair of coping saws. Both handles have stood up to multiple users and abusers. - Fret Saw – Similar to a coping saw, these saws often sport adjustable frames, use metal & tile cutting blades, and sometimes utilize a deep, shallow C-shape. Often called jeweler’s saws by people with more expensive hobbies.
Sawing Tips:
Use a functional tool. While cheap tools can work as well as expensive tools, you do get what you pay for. The conventional back saws and carpenter saws available at the big box stores aren’t worth a penny. In used tools, look for straight saw plates, no major rust and a comfortable handle.
Technique matters. You shouldn’t have the saw in a death grip. Use a clamp to hold the work steady. Practice, practice, practice.
Beeswax. A little beeswax or paste wax right on the saw plate will lubricate the saw and help with sticky blades.
Thank you for your continued support.
Thank you for visiting my blog. To support for this site, please like WoodshopCowboy on Facebook or follow me on Twitter, Pinterest or Instagram. If you are interested in making and education, why not check out Work Notes, a curated set of Maker articles from the web, published every week?

Tim Tailor would never approve though.
No, he most likely would not!